7 Operation
7.1 Charging the battery
7.1.1 Charging the battery using the FLIR power supply
- Connect the power supply to a wall outlet.
- Connect the power supply cable to the USB connector on the camera.
Follow this procedure:
7.1.2 Charging the battery using the FLIR stand-alone battery charger.
- Connect the stand-alone battery charger to a wall outlet.
-
Remove the battery from the camera.
![Graphic]()
- Put the battery into the stand-alone battery charger.
Follow this procedure:

7.1.3 Charging the battery using a USB cable
- Connect the camera to a computer using a USB cable.
Follow this procedure:
7.2 Turning on and turning off the camera
-
Push the
![Graphic]() button to turn on the camera.
button to turn on the camera.
-
Push and hold the
![Graphic]() button for less than 5 seconds to put the camera in standby mode. The camera then automatically turns off after 48 hours.
button for less than 5 seconds to put the camera in standby mode. The camera then automatically turns off after 48 hours.
-
Push and hold the
![Graphic]() button for more than 10 seconds to turn off the camera.
button for more than 10 seconds to turn off the camera.
7.3 Saving an image
You can save multiple images to the internal camera memory.
Approximately 500 images can be saved to the internal camera memory.
The naming convention for images is
FLIRxxxx.jpg
, where
xxxx
is a unique counter.
Follow this procedure:
-
To save an image, pull the trigger.
![Graphic]()

7.4 Recalling an image
When you save an image, it is stored in the internal camera memory. To display the image again, you can recall it from the
internal camera memory.
-
Push the Archive button
![Graphic]() .
.
- Push the navigation pad left/right or up/down to select the image you want to view.
- Push the center of the navigation pad. This displays the selected image.
-
To return to live mode, push the Cancel button
![Graphic]() repeatedly or push the Archive button
repeatedly or push the Archive button
![Graphic]() .
.
Follow this procedure:
7.5 Deleting an image
You can delete one or more images from the internal camera memory.
-
Push the Archive button
![Graphic]() .
.
- Push the navigation pad left/right or up/down to select the image you want to view.
- Push the center of the navigation pad. This displays the selected image.
- Push the center of the navigation pad. This displays a toolbar.
-
On the toolbar, select
Delete
![Graphic]() .
.
Follow this procedure:
7.6 Deleting all images
You can delete all images from the internal camera memory.
- Push the center of the navigation pad. This displays a toolbar.
-
On the toolbar, select
Settings
![Graphic]() . This displays a dialog box.
. This displays a dialog box.
- In the dialog box, select Device settings . This displays a dialog box.
- In the dialog box, select Reset options . This displays a dialog box.
- In the dialog box, select Delete all saved images .
Follow this procedure:
7.7 Measuring a temperature using a spotmeter
You can measure a temperature using a spotmeter. This will display the temperature at the position of the spotmeter on the
screen.
- Push the center of the navigation pad. This displays a toolbar.
-
On the toolbar, select
Measurement
![Graphic]() . This displays a toolbar.
. This displays a toolbar.
-
On the toolbar, select
Center spot
![Graphic]() .
The temperature at the position of the spotmeter will now be displayed in the top left corner of the screen.
.
The temperature at the position of the spotmeter will now be displayed in the top left corner of the screen.
Follow this procedure:
7.8 Measuring the hottest temperature within an area
You can measure the hottest temperature within an area. This displays a moving spotmeter that indicates the hottest temperature.
- Push the center of the navigation pad. This displays a toolbar.
-
On the toolbar, select
Measurement
![Graphic]() . This displays a toolbar.
. This displays a toolbar.
-
On the toolbar, select Hot spot
![Graphic]() .
.
Follow this procedure:
7.9 Measuring the coldest temperature within an area
You can measure the coldest temperature within an area. This displays a moving spotmeter that indicates the coldest temperature.
- Push the center of the navigation pad. This displays a toolbar.
-
On the toolbar, select
Measurement
![Graphic]() . This displays a toolbar.
. This displays a toolbar.
-
On the toolbar, select Cold spot
![Graphic]() .
.
Follow this procedure:
7.10 Hiding measurement tools
- Push the center of the navigation pad. This displays a toolbar.
-
On the toolbar, select
Measurement
![Graphic]() . This displays a toolbar.
. This displays a toolbar.
-
On the toolbar, select
No measurements
![Graphic]() .
.
Follow this procedure:
7.11 Changing the color palette
You can change the color palette that the camera uses to display different temperatures. A different palette can make it easier
to analyze an image.
- Push the center of the navigation pad. This displays a toolbar.
-
On the toolbar, select
Color
![Graphic]() . This displays a toolbar.
. This displays a toolbar.
- On the toolbar, select a new color palette.
Follow this procedure:
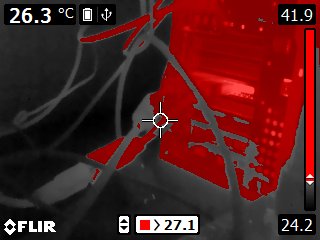
7.12 Working with color alarms
By using color alarms (isotherms), anomalies can easily be discovered in an infrared image. The isotherm command applies a
contrasting color to all pixels with a temperature above or below the specified temperature level.
This table explains the different color alarms (isotherms).
|
Color alarm |
Image |
|---|---|
|
Below alarm
|

|
|
Above alarm
|
|
- Push the center of the navigation pad. This displays a toolbar.
-
On the toolbar, select
Color
![Graphic]() . This displays a toolbar.
. This displays a toolbar.
-
On the toolbar, select the type of alarm:
-
Below alarm
![Graphic]() .
.
-
Above alarm
![Graphic]() .
.
-
Below alarm
- Push the center of the navigation pad. The threshold temperature is displayed at the bottom of the screen.
- To change the threshold temperature, push the navigation pad up/down.
Follow this procedure:
7.13 Changing image mode
The camera can operate in five different image modes:
-
Thermal MSX (Multi Spectral Dynamic Imaging): The camera displays an infrared image where the edges of the objects are enhanced.
![Graphic]()
-
Thermal
: The camera displays a fully thermal image.
![Graphic]()
-
Picture-in-picture
: The camera displays a digital camera image with a superimposed infrared image frame.
![Graphic]()
-
Thermal blending: The camera displays a blended image that uses a mix of infrared pixels and digital photo pixels. The mixing level can be
adjusted.
![Graphic]()
-
Digital camera
: The camera displays a digital camera image.
![Graphic]()


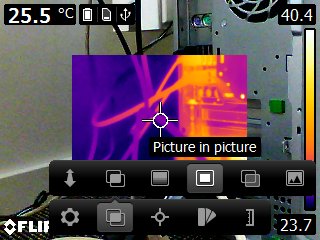


To display a good fusion image (Thermal MSX,
Picture-in-picture
, and Thermal blending modes), the camera must make adjustments to compensate for the small difference in position between the digital camera lens
and the infrared lens. To adjust the image accurately, the camera requires the alignment distance (i.e., the distance to the
object).
- Push the center of the navigation pad. This displays a toolbar.
-
On the toolbar, select
Image mode
![Graphic]() . This displays a toolbar.
. This displays a toolbar.
-
On the toolbar, select one of the following:
-
Thermal MSX
![Graphic]() .
.
-
Thermal
![Graphic]() .
.
-
Picture-in-picture
![Graphic]() .
.
-
Thermal blending
![Graphic]() . This displays a dialog box where you can select the mixing level.
. This displays a dialog box where you can select the mixing level.
-
Digital camera
![Graphic]() .
.
-
Thermal MSX
-
If you have selected the Thermal MSX,
Picture-in-picture
, or Thermal blending mode, also set the distance to the object by doing the following:
-
On the
Image mode
toolbar, select Alignment distance
![Graphic]() . This displays a dialog box.
. This displays a dialog box.
- In the dialog box, select the distance to the object.
-
On the
Image mode
toolbar, select Alignment distance
Follow this procedure:
7.14 Changing the temperature scale mode
The camera can, depending on the camera model, operate in different temperature scale modes:
- Auto mode: In this mode, the camera is continuously auto-adjusted for the best image brightness and contrast.
- Manual mode: This mode allows manual adjustments of the temperature span and the temperature level.
- Push the center of the navigation pad. This displays a toolbar.
-
On the toolbar, select
Temperature scale
![Graphic]() . This displays a toolbar.
. This displays a toolbar.
-
On the toolbar, select one of the following:
-
Auto
![Graphic]() .
.
-
Manual
![Graphic]() .
.
-
Auto
-
To change the temperature span and the temperature level in Manual mode, do the following:
- Push the navigation pad left/right to select (highlight) the maximum and/or minimum temperature.
- Push the navigation pad up/down to change the value of the highlighted temperature.
Follow this procedure:
7.14.1 When to use Manual mode
7.14.1.1 Example 1
Here are two infrared images of a building. In the left image, which is auto-adjusted, the large temperature span between
the clear sky and the heated building makes a correct analysis difficult. You can analyze the building in more detail if you
change the temperature scale to values close to the temperature of the building.

Automatic
|

Manual
|
7.14.1.2 Example 2
Here are two infrared images of an isolator in a power line. To make it easier to analyze the temperature variations in the
isolator, the temperature scale in the right image has been changed to values close to the temperature of the isolator.

Automatic
|

Manual
|
7.15 Changing the camera temperature range
The camera is calibrated for different temperature ranges. Available temperature range options are dependent on the camera
model.
For accurate temperature measurements, you must change the Camera temperature range setting to suit the expected temperature of the object you are inspecting.
Follow this procedure:
1
Push the navigation pad to display the menu system.
2
Select ![]() (Settings) and push the navigation pad. This displays the Settings menu.
(Settings) and push the navigation pad. This displays the Settings menu.
3
Select Camera temperature range and push the navigation pad. This displays a dialog box.
4
Select the appropriate temperature range and push the navigation pad.
7.16 Setting the emissivity as a surface property
To measure temperatures accurately, the camera must know what kind of surface you are measuring. You can choose between the
following surface properties:
- Matt .
- Semi-matt .
- Semi-glossy .
For more information about emissivity, see section
12 Thermographic measurement techniques
.
- Push the center of the navigation pad. This displays a toolbar.
-
On the toolbar, select
Settings
![Graphic]() . This displays a dialog box.
. This displays a dialog box.
- In the dialog box, select Measurement parameters . This displays a dialog box.
- In the dialog box, select Emissivity . This displays a dialog box.
-
In the dialog box, select one of the following:
- Matt .
- Semi-matt .
- Semi-glossy .
Follow this procedure:
7.17 Setting the emissivity as a custom material
Instead of specifying a surface property as matt, semi-matt or semi-glossy, you can specify a custom material from a list
of materials.
For more information about emissivity, see section
12 Thermographic measurement techniques
.
- Push the center of the navigation pad. This displays a toolbar.
-
On the toolbar, select
Settings
![Graphic]() . This displays a dialog box.
. This displays a dialog box.
- In the dialog box, select Measurement parameters . This displays a dialog box.
- In the dialog box, select Emissivity . This displays a dialog box.
- In the dialog box, select Custom material . This displays a list of materials with known emissivities.
- In the list, select the material.
Follow this procedure:
7.18 Changing the emissivity as a custom value
For very precise measurements, you may need to set the emissivity, instead of selecting a surface property or a custom material.
You also need to understand how emissivity and reflectivity affect measurements, rather than just simply selecting a surface
property.
Emissivity is a property that indicates how much radiation originates from an object as opposed to being reflected by it.
A lower value indicates that a larger proportion is being reflected, while a high value indicates that a lower proportion
is being reflected.
Polished stainless steel, for example, has an emissivity of 0.14, while a structured PVC floor typically has an emissivity
of 0.93.
For more information about emissivity, see section
12 Thermographic measurement techniques
.
- Push the center of the navigation pad. This displays a toolbar.
-
On the toolbar, select
Settings
![Graphic]() . This displays a dialog box.
. This displays a dialog box.
- In the dialog box, select Measurement parameters . This displays a dialog box.
- In the dialog box, select Emissivity . This displays a dialog box.
- In the dialog box, select Custom value . This displays a dialog box where you can set a custom value.
Follow this procedure:
7.19 Changing the reflected apparent temperature
This parameter is used to compensate for the radiation reflected by the object. If the emissivity is low and the object temperature
significantly different from that of the reflected temperature, it will be important to set and compensate for the reflected
apparent temperature correctly.
For more information about reflected apparent temperature, see section
12 Thermographic measurement techniques
.
- Push the center of the navigation pad. This displays a toolbar.
-
On the toolbar, select
Settings
![Graphic]() . This displays a dialog box.
. This displays a dialog box.
- In the dialog box, select Measurement parameters . This displays a dialog box.
- In the dialog box, select Reflected apparent temperature . This displays a dialog box where you can set a value.
Follow this procedure:
7.20 Changing the distance between the object and the camera
To measure temperatures accurately, the camera requires the distance between the camera and the object.
- Push the center of the navigation pad. This displays a toolbar.
-
On the toolbar, select
Settings
![Graphic]() . This displays a dialog box.
. This displays a dialog box.
- In the dialog box, select Measurement parameters . This displays a dialog box.
- In the dialog box, select Distance. This displays a dialog box where you can select a distance.
Follow this procedure:
7.21 Performing a non-uniformity correction (NUC)
A non-uniformity correction is an image correction carried out by the camera software to compensate for different sensitivities of detector elements and
other optical and geometrical disturbances
1
.
The non-uniformity correction process should be carried out whenever the output image becomes spatially noisy. The output
can become spatially noisy when the ambient temperature changes (such as from day to night operation, and vice versa).
To perform a non-uniformity correction, push and hold the Image archive button ![icon]() for more than 2 seconds.
for more than 2 seconds.
7.22 Configuring Wi-Fi
Depending on your camera configuration, you can connect the camera to a wireless local area network (WLAN) using Wi-Fi, or
let the camera provide Wi-Fi access to another device.
You can connect the camera in two different ways:
- Most common use: Setting up a peer-to-peer connection (also called an ad hoc or P2P connection). This method is primarily used with other devices, e.g., an iPhone or iPad.
- Less common use: Connecting the camera to a WLAN.
7.22.1 Setting up a peer-to-peer connection (most common use)
- Push the center of the navigation pad. This displays a toolbar.
-
On the toolbar, select
Settings
![Graphic]() . This displays a dialog box.
. This displays a dialog box.
- Select Device settings and push the center of the navigation pad.
- Select Wi-Fi and push the center of the navigation pad.
- Select Share and push the center of the navigation pad.
-
(Optional step.) To display and change the parameters, select Settings and push the center of the navigation pad.
- To change the channel (the channel that the camera is broadcasting on), select Channel and push the center of the navigation pad.
- To activate WEP (encryption algorithm), select WEP and push the center of the navigation pad. This will check the WEP check box.
- To change the WEP password, select Password and push the center of the navigation pad.
Follow this procedure:
7.22.2 Connecting the camera to a wireless local area network (less common use)
- Push the center of the navigation pad. This displays a toolbar.
-
On the toolbar, select
Settings
![Graphic]() . This displays a dialog box.
. This displays a dialog box.
- Select Device settings and push the center of the navigation pad.
- Select Wi-Fi and push the center of the navigation pad.
- Select Connect to network and push the center of the navigation pad.
- To display a list of the available networks, select Networks and push the center of the navigation pad.
-
Select one of the available networks.
Password-protected networks are indicated with a padlock icon, and for these you will need to enter a password.
Follow this procedure:
7.23 Changing the settings
You can change a variety of settings for the camera.
- Push the center of the navigation pad. This displays a toolbar.
-
On the toolbar, select
Settings
![Graphic]() . This displays a dialog box.
. This displays a dialog box.
- In the dialog box, select the setting that you want to change and use the navigation pad to display additional dialog boxes.
Follow this procedure:
The Settings menu includes the following:
- Measurement parameters.
- Camera temperature range.
- Save options.
- Device settings.
7.23.1 Measurement parameters
- Emissivity.
- Reflected temperature.
- Distance.
7.23.2 Camera temperature range
For accurate temperature measurements, you must change the Camera temperature range setting to suit the expected temperature of the object you are inspecting.
Available temperature range options are dependent on the camera model. The unit (
℃
or
℉
) depends on the temperature unit setting, see section
7.23.4
Device settings
.
7.23.3 Save options
- Photo as separate JPEG : When this menu command is selected, the digital photo from the visual camera is saved at its full field of view as a separate JPEG image.
7.23.4 Device settings
-
Language, time & units:
- Language .
- Temperature unit .
- Distance unit.
- Date & time .
- Date & time format .
-
Wi-Fi
- Off
- Share
-
Connect to network
- Networks
-
Reset options
:
- Reset default camera mode .
- Reset device settings to factory default .
- Delete all saved images .
- Auto power off .
- Display intensity .
-
Demonstration mode: This menu command provides a camera mode that displays various images without any user interventions. The camera mode is
intended for demonstration purposes or when displaying the camera in a store.
- Off.
- Electrical applications.
- Building applications.
- Camera information : This menu command displays various items of information about the camera, such as the model, serial number, and software version.
7.24 Updating the camera
To take advantage of our latest camera firmware, it is important that you keep your camera updated. You update your camera
using FLIR Tools.
- Start FLIR Tools.
- Start the camera.
- Connect the camera to the computer using the USB cable.
- On the Help menu in FLIR Tools, click Check for updates.
- Follow the on-screen instructions.
Follow this procedure: