3 The secret to a good thermal image
3.1 Introduction
The use of thermal cameras has spread to many professional environments in recent years. They are easy to handle, and thermal
images are quick to take. Images can also be attached to reports easily, e.g., for an inspection of an electrical installation
or building as evidence of work carried out or of any faults or deviations identified. However, people often forget that an
image to be used as evidence or even proof before the courts must meet certain requirements: this is not achieved with a quick
snapshot. So, what characterizes a really good thermal image?
3.2 Background
During the practical exercises in our thermography training classes we notice, time and time again, how difficult some participants
find choosing the optimal camera settings for different tasks. Not everyone has a background in, for example, amateur photography
(more on the difference between thermography and photography in the next section), and to take a good and meaningful thermal
image you need some knowledge of photography, including its practical application. For this reason, it is hardly surprising
that thermographers, particularly those without training, repeatedly produce reports with thermal images that are devoid of
meaning or even support the wrong conclusions and are fit only for the waste bin. Unfortunately, such reports are found not
only in companies in which thermography is more of an added bonus but also in businesses where these reports may be part of
a critical process monitoring or maintenance program. There are two main reasons for this: either the users don't know what
a good thermal image is or how to take one, or—for whatever reason—the job is not being done properly.
3.3 A good image
As thermography and photography are related, it makes sense to take a look at what is important to professional photographers.
How do they characterize a good image? Three aspects can be pointed out as the most important:
- An image has to touch the observer in some way. That means it needs to be unusual, striking, or unique, and has to arouse interest and, depending on the genre, emotion.
- The composition and balance must be in harmony; the image detail and content must go together aesthetically.
- The lighting must be interesting, such as back lighting or side lighting that casts dramatic shadows, or evening light or other pleasing illumination—whatever fits the overall effect that the photographer wants.
To what extent can these concepts be applied to thermography?
With thermography, the motif should also be interesting. In other words, our aim is to depict an object or its condition.
Emotions are not required—facts have priority in thermal images (assuming they are not an art project!). In everyday working
life, it is important to illustrate thermal patterns clearly and to facilitate temperature measurements.
The thermal image must also have suitable image detail and display the object at an appropriate size and position.
Without external illumination, neither visual sight nor photography is possible because what we see with our eyes or capture
with a camera is reflected light. In thermography, the camera records both emitted and reflected radiation. Therefore, the
relationship and intensity of the infrared radiation, both emitted by the object and by the surrounding environment, are important.
Brightness and contrast in the image are then adjusted by changing the displayed temperature interval.
The comparison between photography and thermography can be summarized in a table using a few keywords:
|
Photography |
Thermography |
|---|---|
|
Interesting motif
|
The object to be examined
|
|
“Tells a story”
|
“Presents facts”
|
|
Aesthetically pleasing
|
Clear heat patterns
|
|
Emotive
|
Objective
|
|
Image detail
|
Image detail
|
|
Focus
|
Focus
|
|
Lighting
|
Emission and reflection
|
|
Brightness
|
Brightness
|
|
Contrast
|
Contrast
|
As with photography, in thermography there are countless possibilities for editing images—provided they are saved as radiometric
images. However, not all settings can be changed, and not all image errors can be corrected.
3.4 The three unchangeables—the basis for a good image
3.4.1 Focus
A professional thermal image is always focused and sharp, and the object and heat pattern must be clear and easy to recognize.
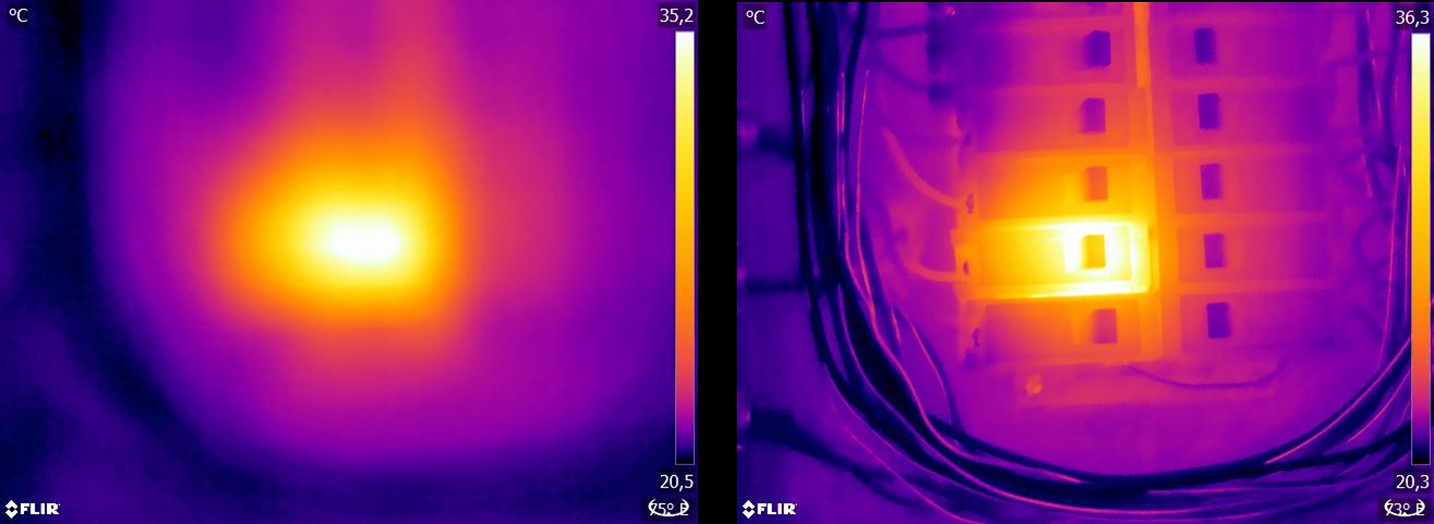
Figure 3.1 Only hazy “patches of heat” can be seen in the unfocused image (left). The focused image (right) clearly shows which object is being observed and where the object is warm.
A blurred image not only comes across as unprofessional and makes it harder to identify the object and any faults (see
Figure 3.1
) but can also lead to measurement errors (see
Figure 3.2
), which are more serious the smaller the measurement object. Even if all other parameters are set correctly, the measurement
values from an unfocused thermal image are highly likely to be incorrect.
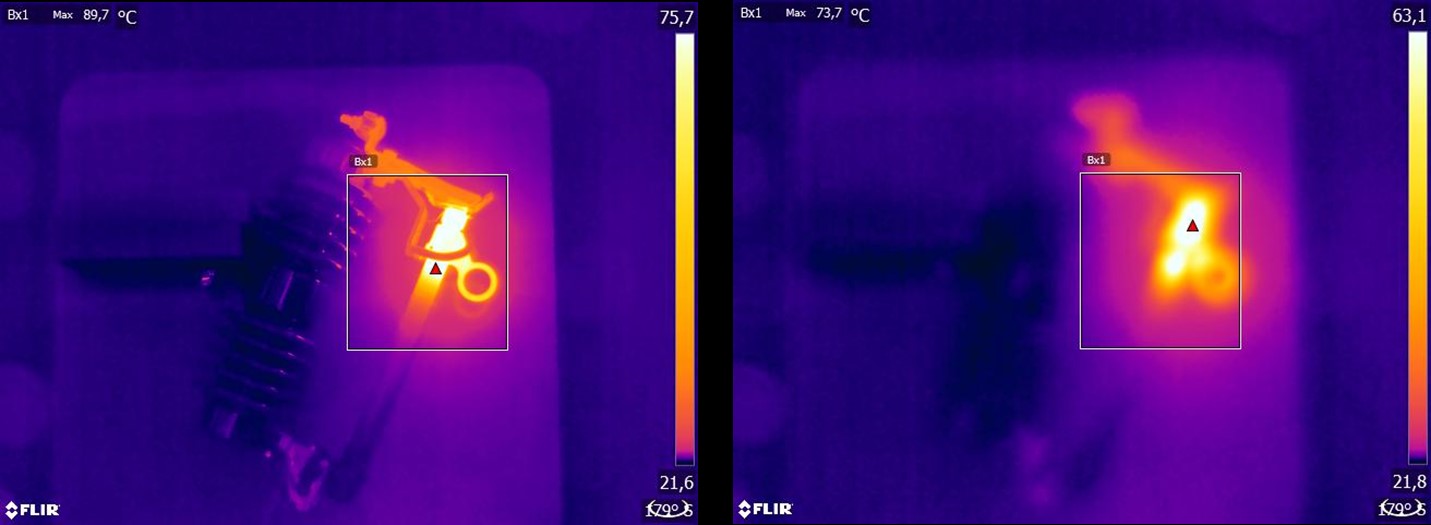
Figure 3.2 Focused thermal image (left) with a maximum temperature of Tmax = 89.7°C (193.5°F) and an unfocused thermal image (right) with a maximum temperature of Tmax = 73.7°C (164.7°F).
Of course, the size of the detector matrix also plays a role in image quality. Images taken by cameras with small detectors
(i.e., with fewer pixels) are more blurred or “grainier” and give the impression that they are not focused (see
Figure 3.3
). It should also be noted that not every camera can be focused, and in this case the only means of focusing the camera is
by changing the distance from the object.
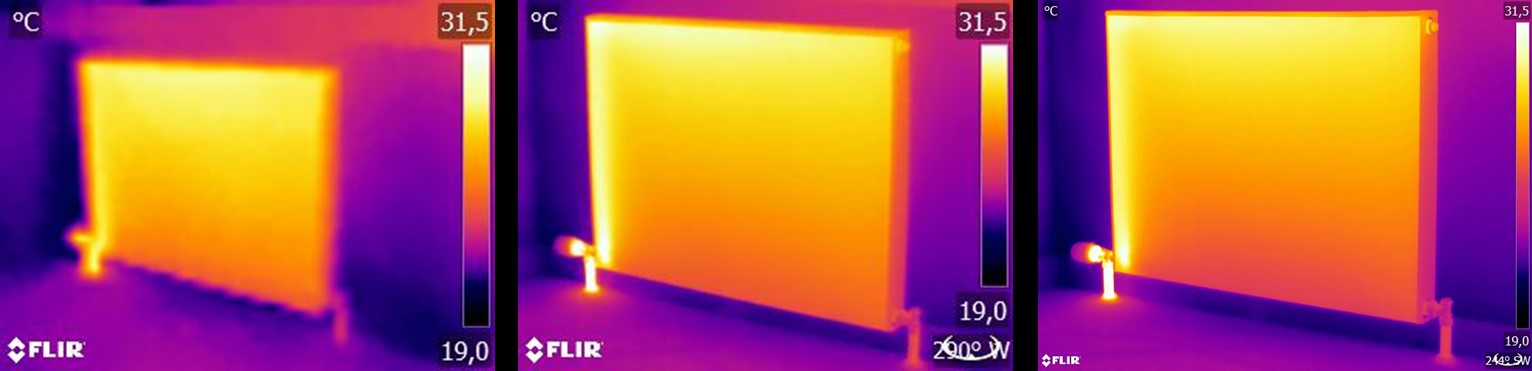
Figure 3.3 The same radiator from the same distance with the same settings, taken by three different thermal cameras: FLIR C2 (left), FLIR T440 (middle), and FLIR T640 (right).
3.4.2 Temperature range
For hand-held uncooled microbolometer cameras, the “exposure” is essentially preset by the image frame rate. This means that
it is not possible to choose for how long—and therefore how much—radiation hits the camera detector. For this reason, an appropriate
temperature range must be selected that matches the amount of incident radiation. If a temperature range is selected that
is too low, the image will be oversaturated, as objects with higher temperatures emit more infrared radiation than colder
objects. If you select a temperature range that is too high, the thermal image will be “underexposed,” as can be seen in
Figure 3.4
.
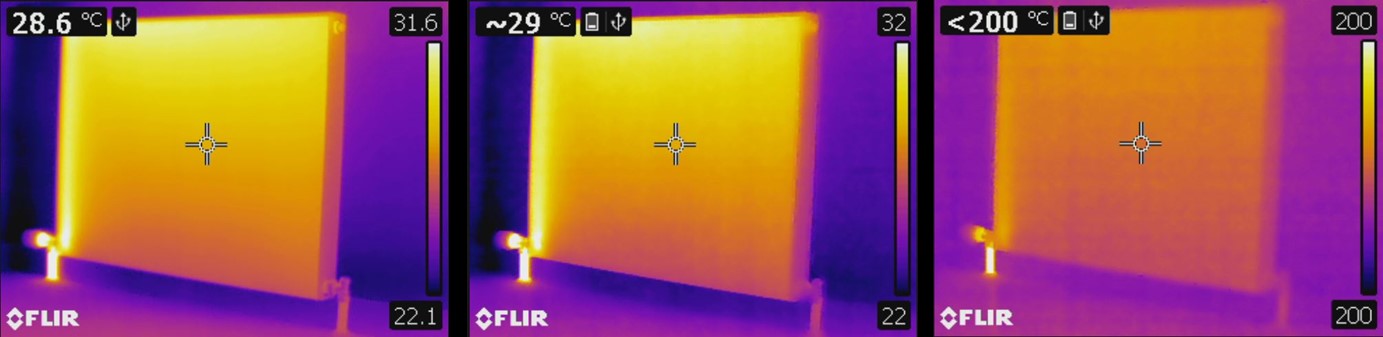
Figure 3.4 Images from a FLIR T440 with temperature ranges of –20 to +120°C, (left, –4 to +248°F), 0 to +650°C (middle, +32 to +1202°F) and +250 to +1200°C (right, +482 to +2192°F). All other settings are unchanged.
To take an image or temperature measurement, the lowest possible temperature range available on the camera should be selected.
However, it must also include the highest temperature in the image (see
Figure 3.5
).
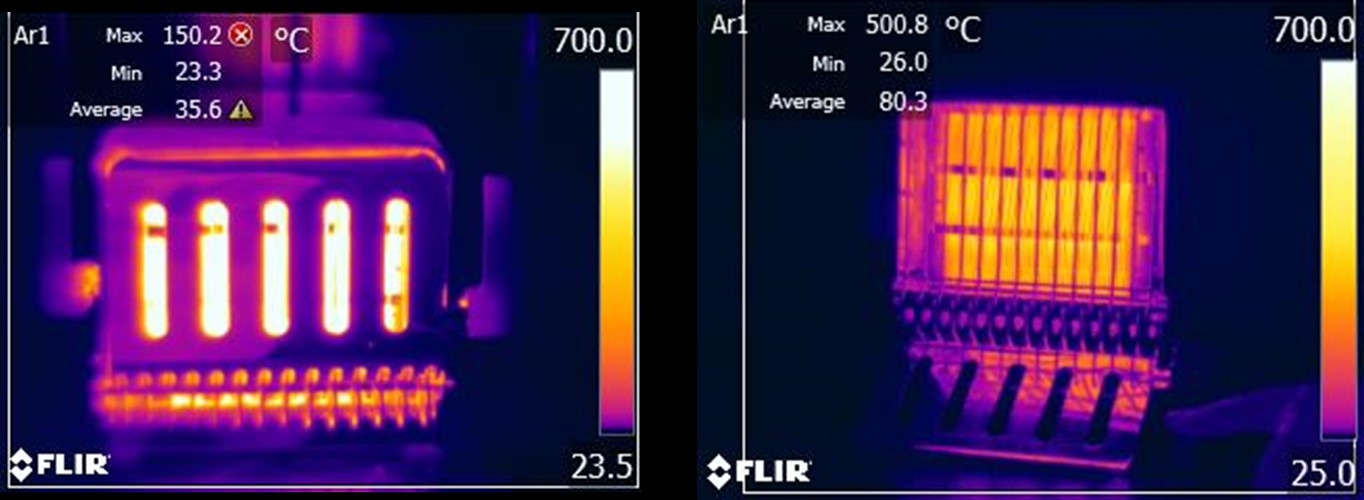
Figure 3.5 An image of the same object taken with different temperature ranges: –20 to 120°C (left, –4 to +248°F) and 0 to 650°C (right, +32 to +1202°F). The temperature in the left image is displayed with a warning sign (a red circle with a white cross) because the measured values are outside the calibrated range.
Depending on the camera model and configuration options, overdriven and underdriven areas can be displayed in a contrasting
color.
3.4.3 Image detail and distance from the object
Illumination in photography corresponds in thermography to the interplay of radiation from the object and reflected radiation
from the surrounding environment. The latter is unwanted because interfering—or, at the very least, spot—reflections need
to be avoided. This is achieved by choosing a suitable position from where to take images. It is also advisable to select
a position from which the object of interest can be seen clearly and is not hidden. This may seem obvious but in the building
sector, for example, it is common to find reports in which pipes or windows to be investigated are hidden behind sofas, indoor
plants or curtains.
Figure 3.6
illustrates this situation—which occurs all too regularly.
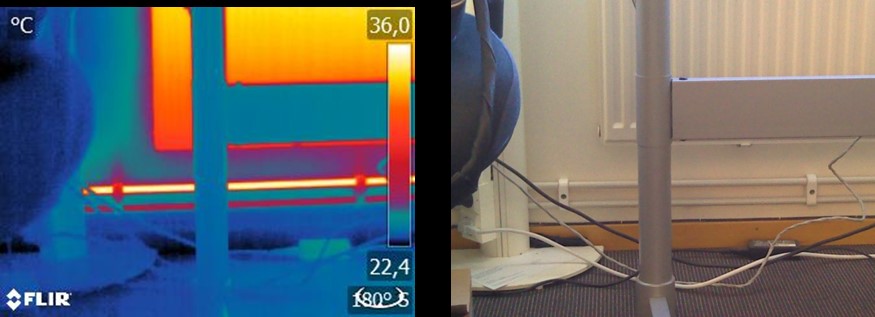
Figure 3.6 “Thermographic inspection” of an inaccessible object.
It is also important that the object under investigation, or its areas of interest, take up the whole thermal image. This
is particularly true when measuring the temperature of small objects. The spot tool must be completely filled by the object
to enable correct temperature measurements. Since the field of view and therefore the spot size are determined by both the
distance to the object and the camera’s optics, in such situations the distance to the object must either be reduced (get
closer!) or a telephoto lens must be used (see
Figure 3.7
).
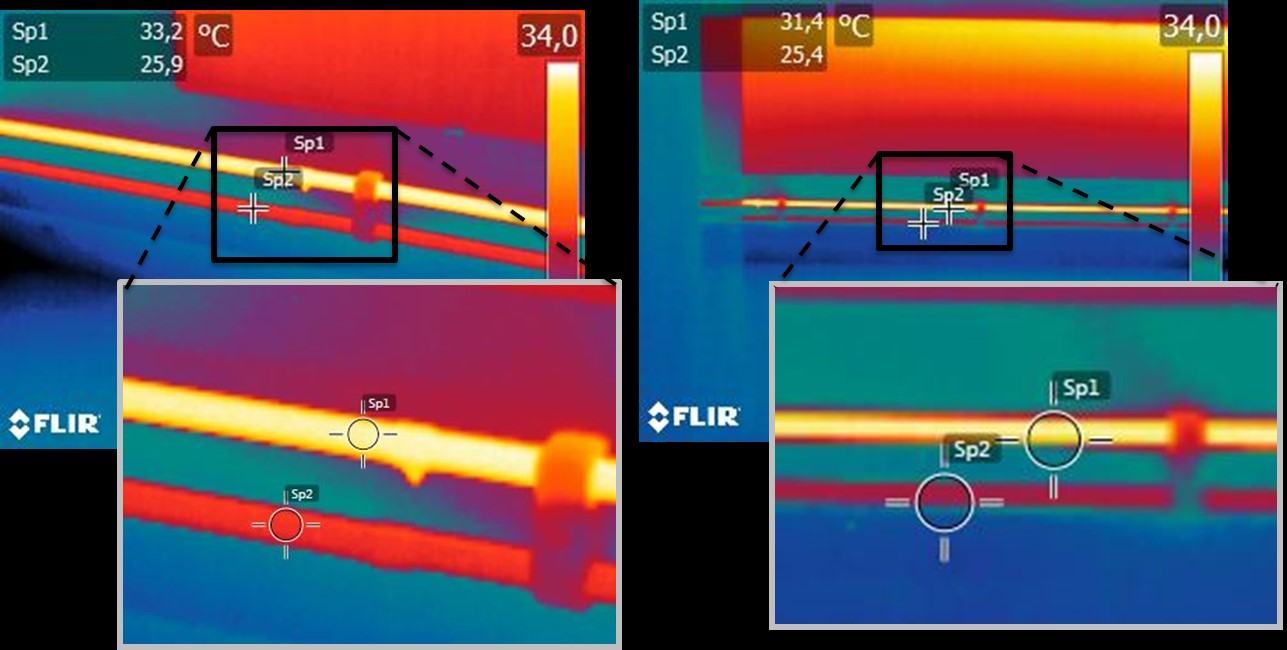
Figure 3.7 Supply and return lines from radiators in an open-plan office. The left image was taken from a distance of 1 m: the measurement spot is filled and the temperature measurement is correct. The right image was taken from a distance of 3 m: the measurement spot is not completely filled and the measured temperature values are incorrect (31.4 and 24.4°C (88.5 and 75.9°F) instead of 33.2 and 25.9°C (91.8 and 78.6°F)).
3.5 The changeables—image optimization and temperature measurement
3.5.1 Level and span
After choosing the appropriate temperature range, you can adjust the contrast and brightness of the thermal image by changing
the temperature intervals displayed. In manual mode, the false colors available in the palette can be assigned to the temperatures
of the object of interest. This process is often referred to as “thermal tuning.” In automatic mode, the camera selects the
coldest and warmest apparent temperatures in the image as the upper and lower limits of the temperature interval currently
displayed.
A good or problem-specific scaling of the thermal image is an important step in the interpretation of the image, and is, unfortunately,
often underestimated (see
Figure 3.8
).
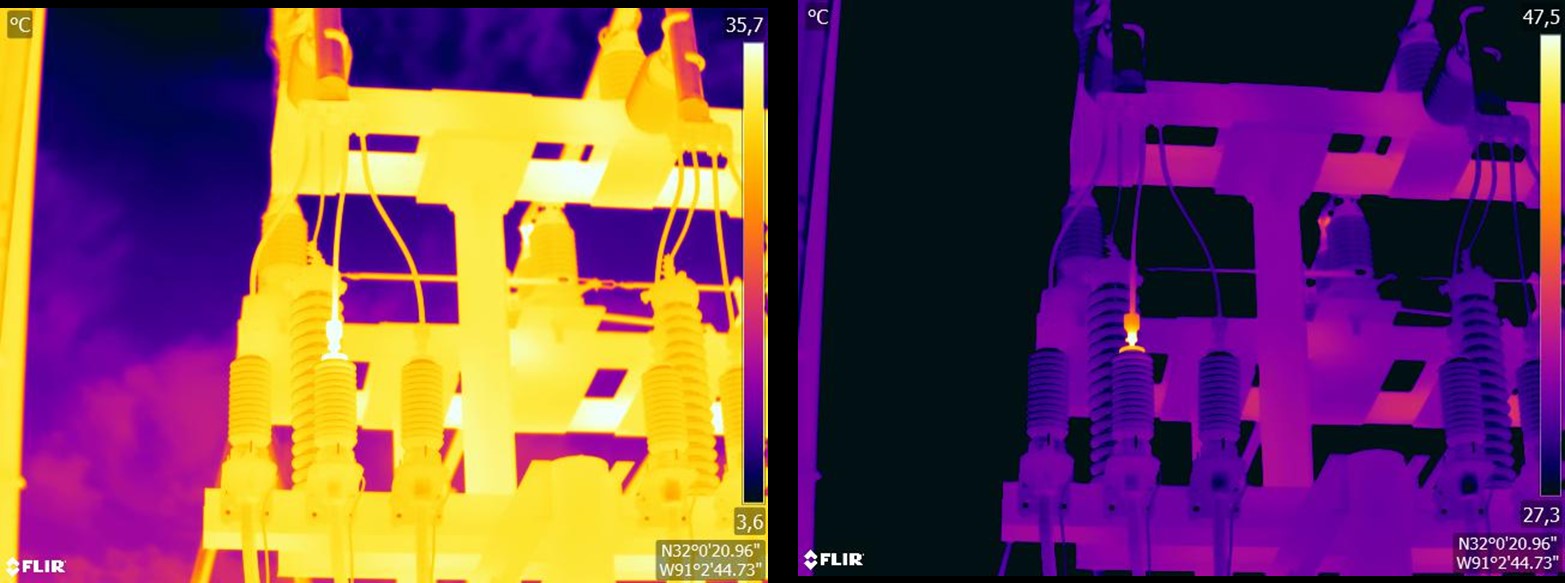
Figure 3.8 A thermal image in automatic mode (left) and in manual model (right). The adjusted temperature interval increases the contrast in the image and makes the faults clear.
3.5.2 Palettes and isotherms
Palettes represent intervals with the same apparent temperatures using different sets of colors. In other words, they translate
specific radiation intensities into colors that are specific to a particular palette. Frequently used palettes include the
gray, iron, and rainbow palettes (see
Figure 3.9
). Gray tones are particularly suited to resolving small geometric details but are less suited to displaying small differences
in temperature. The iron palette is very intuitive and also easy to understand for those without much experience in thermography.
It offers a good balance between geometric and thermal resolution. The rainbow palette is more colorful and alternates between
light and dark colors. This results in greater contrast, but this can lead to a noisy image for objects with different surfaces
or many temperatures.
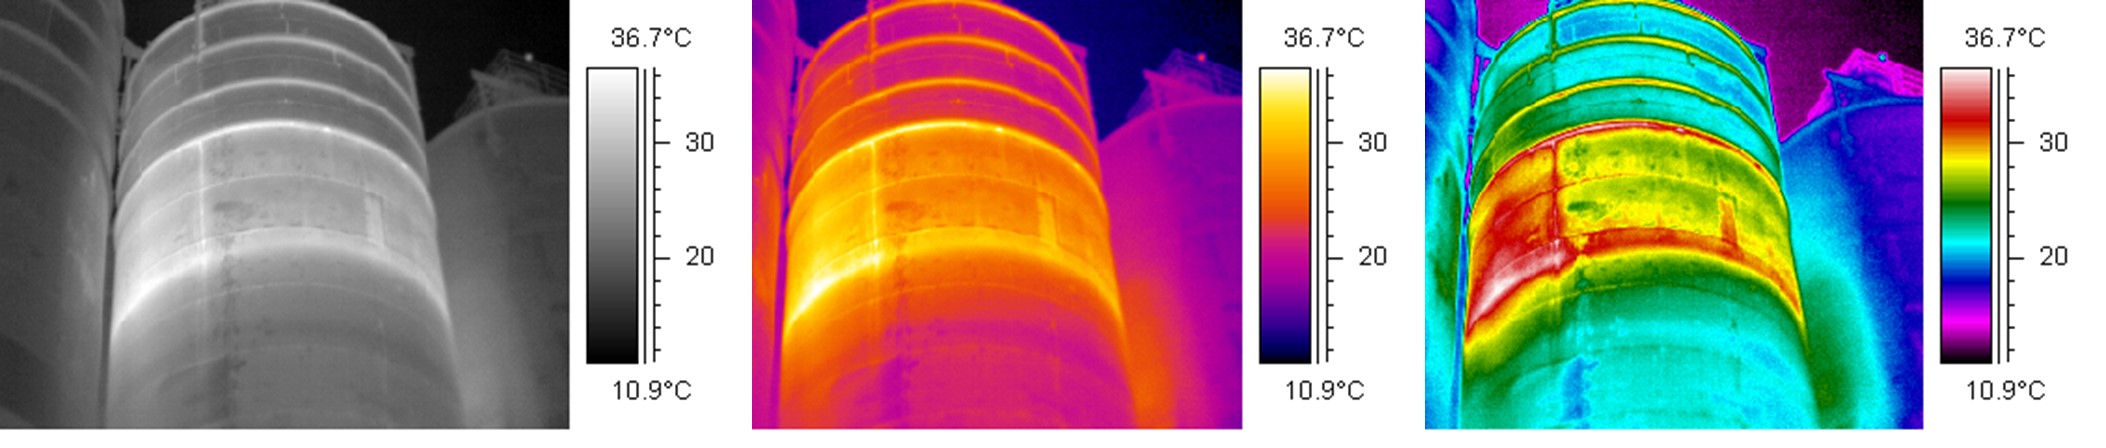
Figure 3.9 Gray, iron, and rainbow palettes (left to right).
The isotherm is a measuring function that displays a given interval of the same apparent temperature or radiation intensity
in a color that is different from the palette. It allows you to emphasize temperature patterns in the image (see
Figure 3.10
).
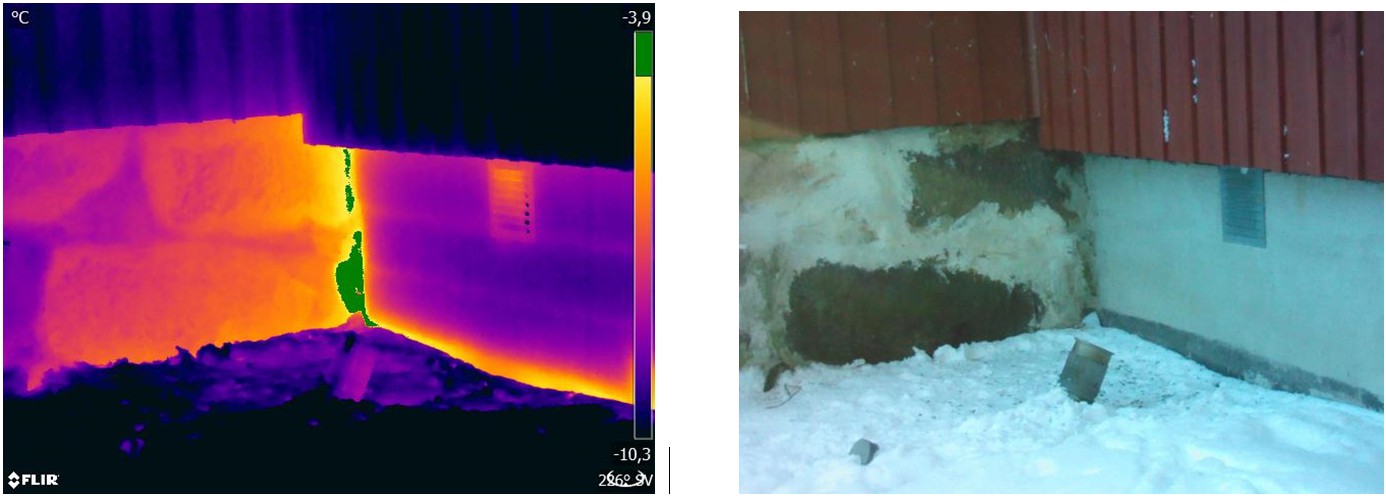
Figure 3.10 Foundation wall: connection between the old (left in image) and the new (right in image) parts of the building. The isotherm highlights an area of air leakage.
3.5.3 Object parameters
As we have seen, the appearance of thermal images is dependent on the thermographer’s technique and choice of settings, and
the look of saved radiometric images can be altered by editing. However, it is also possible to change the settings that are
relevant for the calculation of temperatures. In practice, this means that the emissivity and reflected apparent temperature
can be altered retrospectively. If you notice that these parameters have been set incorrectly or want to add more measurement
spots, the temperature measurement values will be calculated or recalculated according to the changes (see
Figure 3.11
).
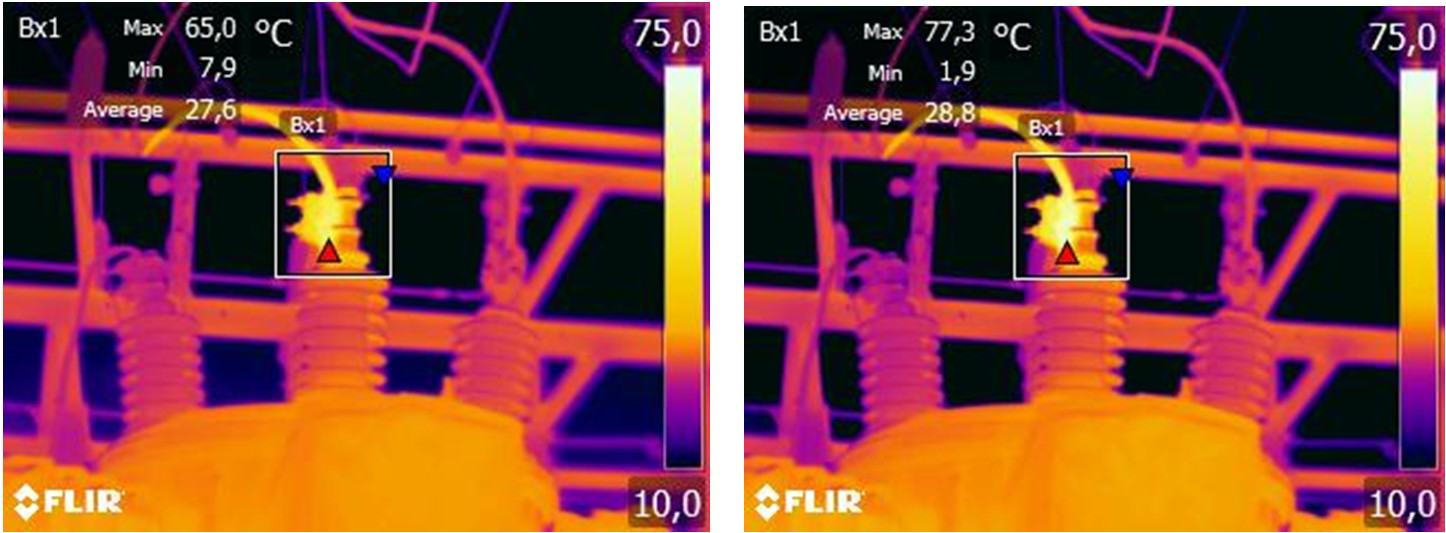
Figure 3.11 Change in emissivity for a saved image. The maximum temperature is 65.0°C (149°F) for ε = 0.95 in the left image and 77.3°C (171.1°F) for ε = 0.7 in the right image.
3.6 Taking images—practical tips
The following list includes some practical tips. However, note that this is not a comprehensive description of the thermal
imaging procedure.
- Ensure that the camera is saving radiometric images.
-
Choose an appropriate position from which to take images:
- Observe the radiative situation.
- Check that the object is clearly visible and displayed at an appropriate size and position.
- If you change the emissivity, monitor the temperature range and make sure that it remains appropriate.
- Focus.
- Use a tripod to minimize camera shake.
- Carry out thermal tuning.
- Take note of the object description, object size, actual distance, environmental conditions, and operating conditions.
It is easier to edit the thermal image when it is saved or “frozen” (in “Preview”). Also, since you don't have to do everything
on site, you can leave dangerous zones immediately after taking the image. If possible, take a few more images than you need—including
from different angles. This is preferable to taking too few! You can then choose the best image afterwards, at leisure.
3.7 Conclusion
Taking a good thermal image does not require any magic tricks—solid craft and sound work is all that is required. Many of
the points mentioned may seem trivial and “old news,” particularly to amateur photographers. Of course, the equipment plays
a role easier to ensure sharp images. Better, i.e. high-definition, cameras allow the fast localization of even small anomalies,
and without focusing capabilities it is always difficult to capture a sharp image. However, high-end cameras are no guarantee
of good images if used incorrectly. The basis for good, professional work is education and training in thermography, exchange
of knowledge with other thermographers, and, of course, practical experience.