14 Camera functions
14.1 Thermography functions
14.1.1 Color palettes
14.1.2 Adjusting the temperature scale
-
In live mode, select
 (Temperature scale) and then
  (Auto) or
  (Manual) to enter automatic or manual image adjustment mode.
- In preview/edit mode, manual image adjustment mode is active.
- To simultaneously change the temperature scale minimum and maximum limits, place your finger on the screen and move it up/down.
-
To change the minimum or the maximum limit, do the following:
- Touch the maximum or minimum temperature that you want to change.
- Place your finger on the screen and move it up/down to change the value of the highlighted temperature.
- To enhance the details of a certain point of interest in the image, touch that point on the screen. The image will be auto-adjusted based on the thermal content of the area around the touched point.
14.1.3 Image modes
- Thermal: An infrared image is displayed.
- Thermal MSX (Multi Spectral Dynamic Imaging): The camera displays an infrared image where the edges of the objects are enhanced with visual image details.
- Picture in picture: An infrared image frame is displayed on top of the visual image.
- Digital camera: The visual image captured by the digital camera is displayed.
14.1.4 Measurement tools
14.1.4.1 Measurement parameters
|
Object distance
|
1.0 m (3.3 ft.)
|
|
Atmospheric temperature
|
20°C (69°F)
|
|
Relative humidity
|
50%
|
|
Reflected temperature
|
20°C (69°F)
|
|
Emissivity
|
0.95
|
14.1.5 Color alarms
14.1.6 Non-uniformity correction (NUC)
 for more than 2 seconds.
14.2 Saving images and video
14.2.1 General
14.2.2 Saving an image
14.2.3 Annotating images
-
You can set the camera to display annotation tools when an image is saved. Select
![icon]() (Settings) > Save options & storage > Add annotation after saving.
(Settings) > Save options & storage > Add annotation after saving.
- You can also add annotations to a saved image in the image archive.
14.2.4 Programming the camera (time-lapse)
Select  (Settings) > Recording mode > Time-lapse.
Push the navigation pad. This displays a dialog box where you can set the save conditions:
- Save interval: The time interval between each saved image.
- Total number of images: Periodic saving will stop when the set number of images have been saved.
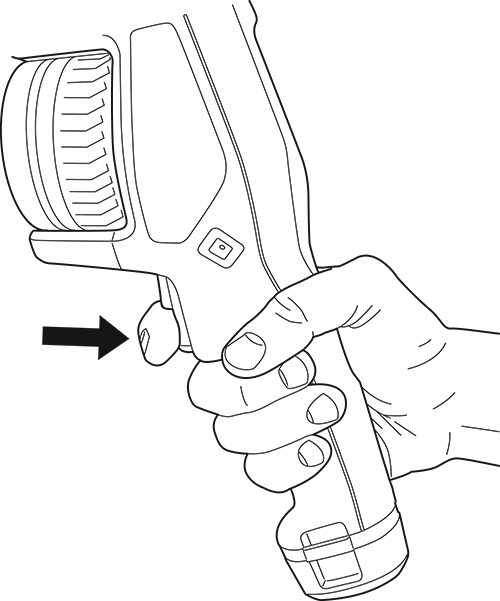
To start the time-lapse (periodic saving), pull and release the trigger.
To manually stop the time-lapse, pull and release the trigger.
When the time-lapse is completed, an information screen is displayed. Push any button or touch the screen to return to the live image.
14.2.5 Recording a video clip
Select
(Settings) > Recording mode > Video.
To start a recording, pull and release the trigger. A counter at the top of the screen displays the duration of the recording.
To stop a recording, pull and release the trigger. The recording is automatically saved to the image archive.
14.3 Gallery — image and video archive
14.3.1 General
14.3.2 Opening a saved image
Push the image archive button
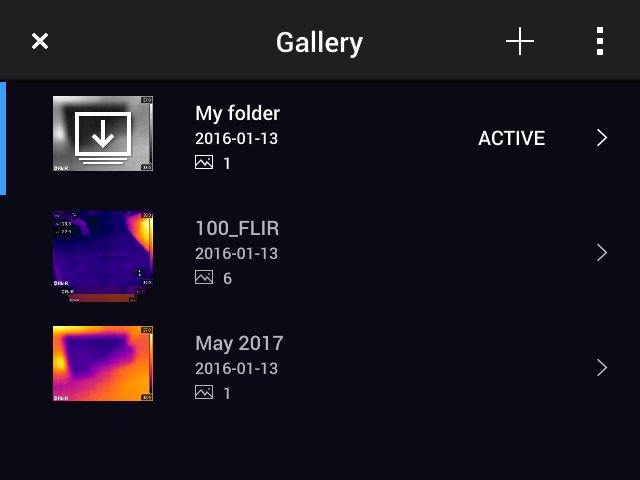
. This displays the Gallery with one or more folders.
Select a folder and push the navigation pad.
Select the image you want to view and push the navigation pad.
To display a toolbar at the top of the screen, push the navigation pad. Do one or more of the following:
-
To switch between an infrared image and a visual image, select the
![icon]() icon and push the navigation pad.
icon and push the navigation pad.
-
To edit the image, delete the image, display image information, or add annotations, select the
![icon]() icon and push the navigation pad. This displays a menu to the right.
icon and push the navigation pad. This displays a menu to the right.
 icon and push the navigation pad.
To view the previous/next image, push the navigation pad left/right.
To return to the folder overview, push the back button  .
.
To return to the Gallery, push the back button
again.
14.3.3 Editing a saved image
To edit a saved image, do the following:
Push the image archive button
. This displays the Gallery with one or more folders.
Select a folder and push the navigation pad.
Select the image you want to edit and push the navigation pad.
Push the navigation pad to display the top toolbar.
On the top toolbar, select the  icon and push the navigation pad.
On the right toolbar, select the  icon and push the navigation pad. This opens the image in edit mode.
Manual image adjustment mode is now active. For image adjustment instructions, see section 14.1.2 Adjusting the temperature scale .
Push the navigation pad. This displays a context menu including options such as changing color palette and changing image mode.
14.3.4 Opening a saved video clip
Push the image archive button
. This displays the Gallery with one or more folders.
Select a folder and push the navigation pad.
Select the video clip you want to view and push the navigation pad.
To play the video clip, do the following:
- Push the navigation pad to display the top toolbar.
-
On the top toolbar, select the
![icon]() icon and push the navigation pad.
icon and push the navigation pad.
- To play or pause the video clip, push the navigation pad.
 icon and push the navigation pad.
To view the previous/next video clip, push the navigation pad left/right.
To return to the folder overview, push the back button
.
To return to the Gallery, push the back button
again.
14.3.5 Creating a new folder
Push the image archive button
. This displays the Gallery.
On the top toolbar, select the  icon and push the navigation pad.
A soft keyboard is displayed, where you can enter the name of the folder by touching the screen.
When completed, touch Done on the soft keyboard.
The new folder automatically becomes the active folder and appears at the top of the Gallery.
14.3.6 Renaming a folder
Push the image archive button
. This displays the Gallery.
On the top toolbar, select the
icon and push the navigation pad.
Select the folder to rename and push the navigation pad.
On the right toolbar, select the  icon and push the navigation pad.
A soft keyboard is displayed, where you can enter the new name of the folder by touching the screen.
When completed, touch Done on the soft keyboard.
14.3.7 Changing the active folder
To change the active folder, do the following:
Push the image archive button
. This displays the Gallery.
On the top toolbar, select the
icon and push the navigation pad.
Select the folder that new images and video clips should be saved to and push the navigation pad. This marks the selected folder with a tick.
On the right toolbar, select the  icon and push the navigation pad.
The selected folder is moved to the top of the Gallery.
14.3.8 Moving files between folders
Push the image archive button
. This displays the Gallery.
Select a folder and push the navigation pad.
On the top toolbar, select the
icon and push the navigation pad.
Use the navigation pad to select the image and video items you want to move. You can also select the items by touching the screen. Selected items are marked with a tick.
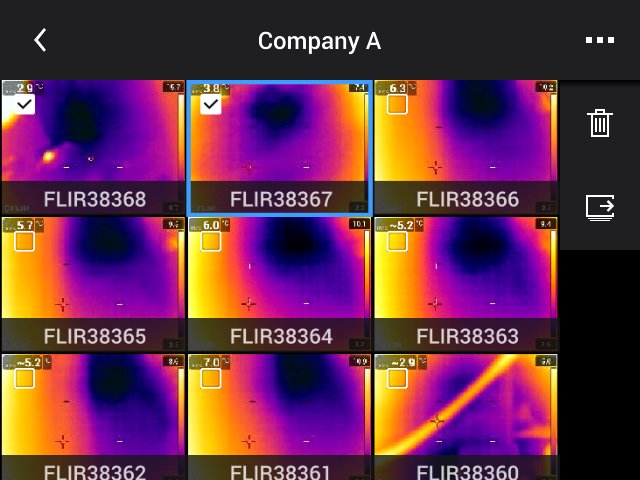
On the right toolbar, select the  icon and push the navigation pad.
Select the destination folder for the selected items and push the navigation pad.
14.3.9 Deleting a folder
Push the image archive button
. This displays the Gallery.
On the top toolbar, select the
icon and push the navigation pad.
Select the folder to delete and push the navigation pad.
On the right toolbar, select the  icon and push the navigation pad. This displays a dialog box.
To delete the folder, select Delete and push the navigation pad.
14.3.10 Deleting an image or video file
Push the image archive button
. This displays the Gallery.
Select a folder and push the navigation pad.
Select the image or video clip you want to delete and push the navigation pad.
Push the navigation pad to display the top toolbar.
On the top toolbar, select the
icon and push the navigation pad.
On the right toolbar, select the
icon and push the navigation pad. This displays a dialog box.
To delete the image, select Delete and push the navigation pad.
14.3.11 Deleting multiple files
Push the image archive button
. This displays the Gallery.
Select a folder and push the navigation pad.
On the top toolbar, select the
icon and push the navigation pad.
Use the navigation pad to select the image and video items you want to delete. You can also select the items by touching the screen. Selected items are marked with a tick.
On the right toolbar, select the
icon and push the navigation pad. This displays a dialog box.
To delete the selected items, select Delete and push the navigation pad.
14.3.12 Deleting all files
Follow this procedure:
Push the navigation pad to display the menu system.
Select
(Settings) and push the navigation pad. This displays the Settings menu.
Use the navigation pad to select Save options & storage > Delete all saved files... .
Push the navigation pad. This displays a dialog box.
To permanently delete all saved files, select Delete and push the navigation pad.
14.4 About image and video files
14.4.1 File-naming convention
14.4.1.1 Resetting the image counter
Push the navigation pad to display the menu system.
Select
(Settings) and push the navigation pad. This displays the Settings menu.
Use the navigation pad to select Device settings > Reset options > Reset image counter....
Push the navigation pad. This displays a dialog box.
To reset the counter, select Reset and push the navigation pad.