7 Handling the camera
7.1 Charging the battery
7.1.1 General
- Before starting the camera for the first time, charge the battery for 2 hours using the stand-alone battery charger.
- Select a mains socket that is near the equipment and easily accessible.
7.1.2 Using the stand-alone battery charger to charge the battery
Put one or two batteries in the battery charger.
Connect the power supply cable plug to the connector on the battery charger.
Connect the power supply mains-electricity plug to a mains socket.
When the white LED on the battery charger glows continuously, the batteries are fully charged.
It is good practice to disconnect the stand-alone battery charger from the mains socket when the batteries are fully charged.
7.1.2.1 Stand-alone battery charger LED indicator
|
Type of signal |
Explanation |
|---|---|
|
The white LED flashes.
|
The battery is being charged.
|
|
The white LED glows continuously.
|
The battery is fully charged.
|
7.1.3 Using the USB battery charger to charge the battery
- Put the battery into the battery compartment of the camera.
- Connect the USB battery charger to a mains socket.
-
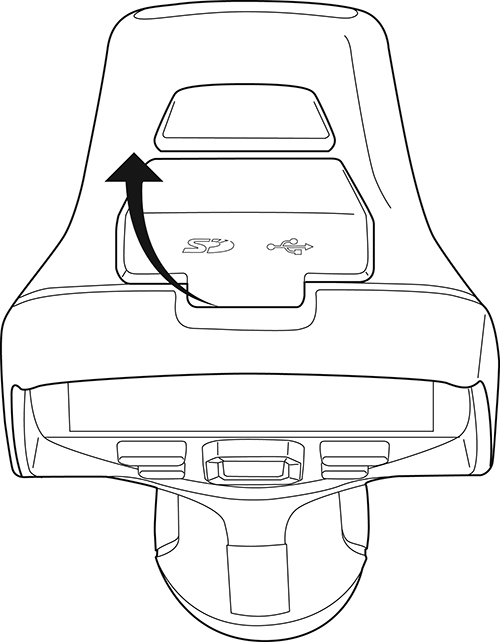
Fold up the rubber cover at the top of the camera.
![Graphic]()
-
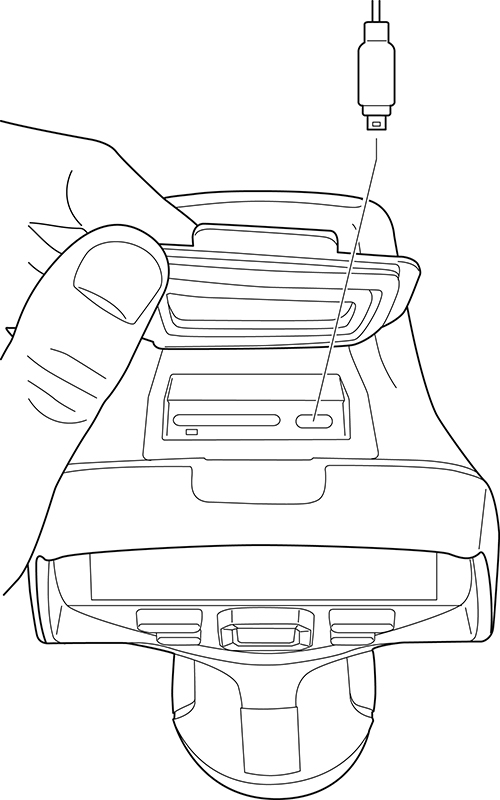
Connect the USB connector of the USB battery charger to the USB-C connector in the connector bay of the camera.
![Graphic]()
-
To check the status of the battery charging, do one of the following:
- If the camera is turned on: Place your finger at the top of the screen and swipe down. The battery status is displayed on the swipe-down menu.
- If the camera is turned off: The battery charging indicator is displayed on the screen.
- It is good practice to disconnect the USB battery charger from the mains socket when the battery is fully charged.
7.1.4 Charging the battery using a USB cable connected to a computer
-
Fold up the rubber cover at the top of the camera.
![Graphic]()
-
Connect a USB cable to the USB-C connector in the connector bay. Connect the other end of the USB cable to the computer.
![Graphic]()
7.2 Removing the battery
- Turn off the camera.
-
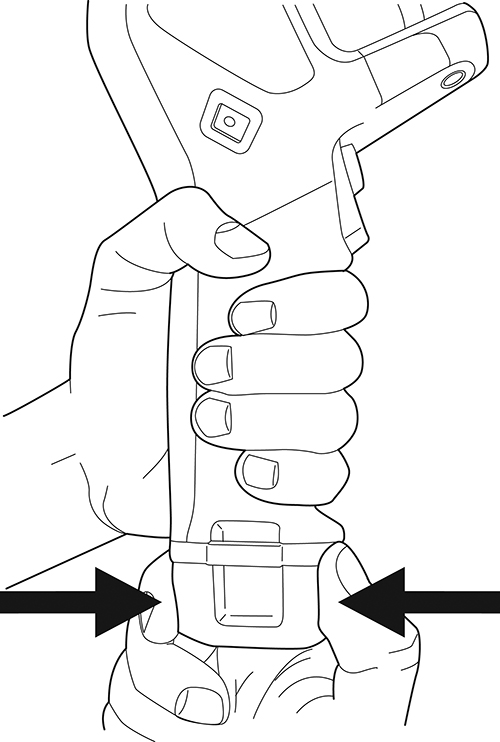
Remove the battery from the camera.
![Graphic]()
7.3 Turning on and turning off the camera
-
To turn on the camera, push the on/off button
![icon]() .
.
-
To turn off the camera, push and hold the on/off button
![icon]() for more than 0.5 second.
for more than 0.5 second.
 .
.7.4 Adjusting the thermal camera focus
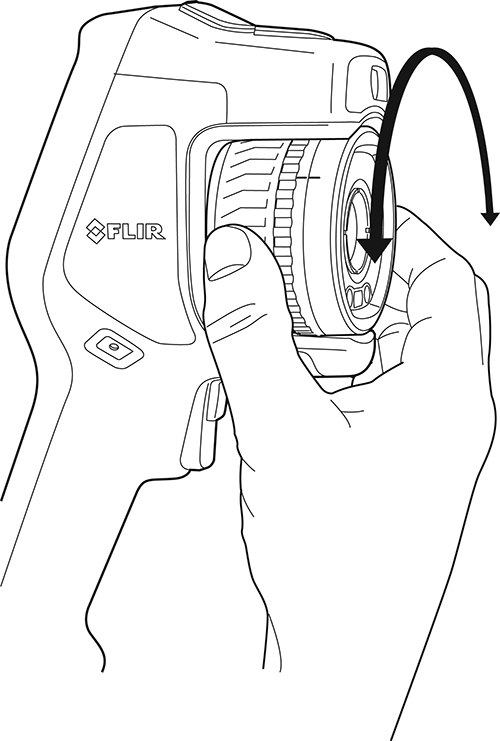
7.4.1 Manual focus
7.4.2 Autofocus
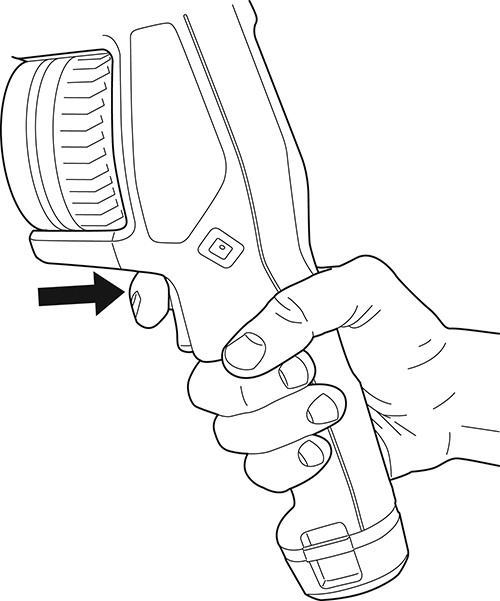
7.4.2.1 Autofocus method
- Contrast: The focus is based on maximizing the image contrast.
- Laser: The focus is based on a laser distance measurement. The laser is used when the camera is autofocusing.
 (Settings) > Device settings > Focus > Auto focus and then select Contrast or Laser.

7.4.3 Continuous autofocus
(Settings) > Device settings > Focus > Continuous autofocus > On or Off.
7.5 P button
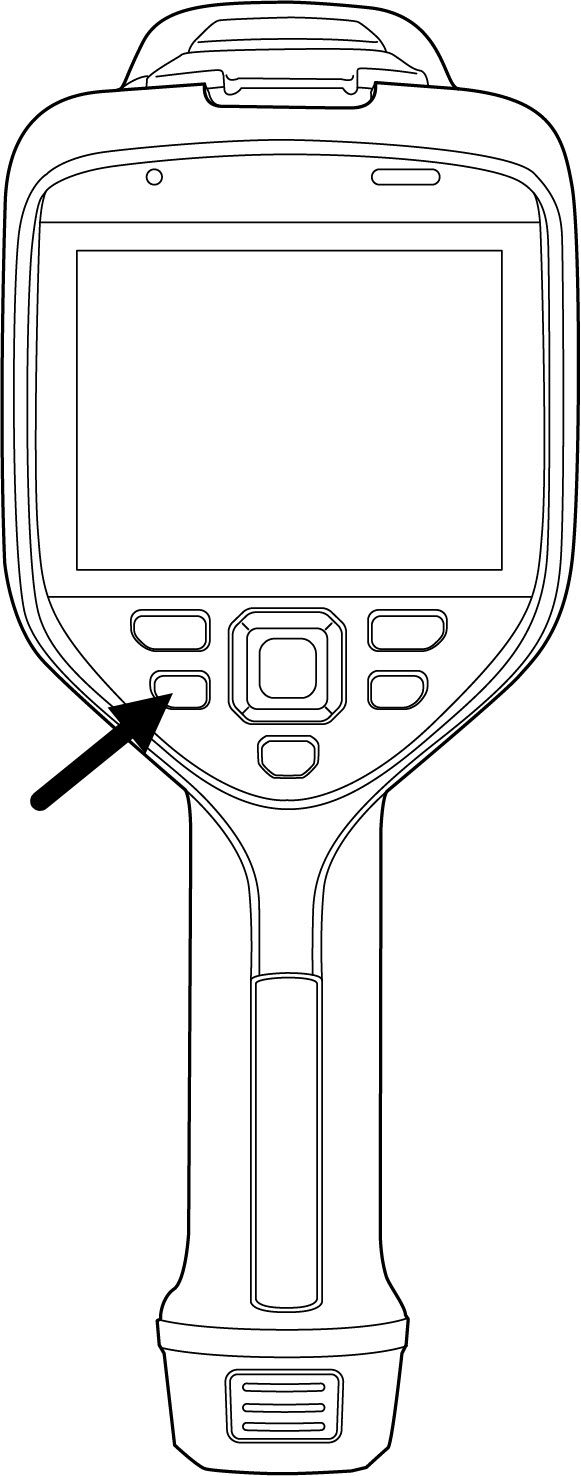
You can also assign different functions to the programmable P button, by doing the following:
Push and hold the P button. This displays the Programmable button menu.
Push the navigation pad up/down to select one of the functions. Push the center of the navigation pad to confirm.
7.6 Remote operation button
7.6.1 Pair devices
7.6.2 Change the battery
- Stick the button to a flat surface.
- Grip the silicon edges and gently screw the upper housing of the button counter clockwise. Lift the top off.
- Replace the battery with a regular coin cell battery (CR2032).
7.7 Zooming an image
- Zoom in: Touch the screen with two fingers and spread the fingers apart.
- Zoom out: Touch the screen with two fingers and pinch the fingers together.
7.8 Connecting external devices and storage media
- An SD memory card.
- A computer to move image and video files to and from the camera, using a USB-C to USB-A or a USB-C to USB-C cable.
- A video monitor or projector, using a USB-C to HDMI adapter.
- A USB battery charger.
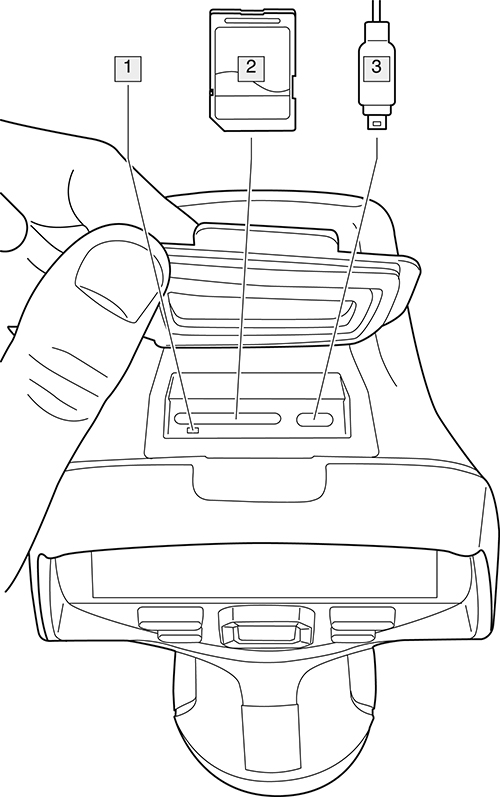
- LED indicator showing that the memory card is busy.
- SD memory card.
- USB-C cable.
7.9 Configuring Wi-Fi
7.9.1 Connecting the camera to a WLAN
Select
(Settings) > Connections > Wi-Fi > Connect to network.
Select Available networks. This displays a list of the available networks.
Select one of the available networks and push the navigation pad.
7.9.2 Setting up a wireless access point
Select
(Settings) > Connections > Wi-Fi > Share.
(Optional step.) To display and change the parameters, select Share settings.
- To change the SSID, select Network name (SSID).
- To change the WPA2 password, select Password.
7.10 Pairing Bluetooth devices
Follow this procedure:
Select
(Settings) > Connections >
Bluetooth
.
If the Bluetooth check box is unchecked, push the navigation pad to enable Bluetooth.
Select Available devices.
Wait until a list of available devices is displayed. This will take about 15 seconds.
When a Bluetooth device is found, select the device to add it, and begin the pairing procedure. The device is then ready to be used.
7.11 Operating the laser
To operate the laser, do the following:
Enable the laser by selecting
(Settings) > Device settings > Lamp & laser > Enable lamp & laser.
To turn on the laser, push and hold the laser button  . The distance to the target is displayed on the screen.
To turn off the laser, release the laser button
.
7.12 Cleaning the camera
7.12.1 Camera housing, cables, and other items
- Warm water
- A weak detergent solution
- A soft cloth
Follow this procedure:
Soak the cloth in the liquid.
Twist the cloth to remove excess liquid.
Clean the part with the cloth.
7.12.2 Infrared lens
- A commercial lens cleaning liquid with more than 30% isopropyl alcohol.
- 96% ethyl alcohol (C2H5OH).
- Cotton wool
Follow this procedure:
Soak the cotton wool in the liquid.
Twist the cotton wool to remove excess liquid.
Clean the lens one time only and discard the cotton wool.
7.12.3 Infrared detector
- Remove the lens from the camera.
- Use pressurized air from a compressed air canister to blow off the dust.
7.13 Hand strap
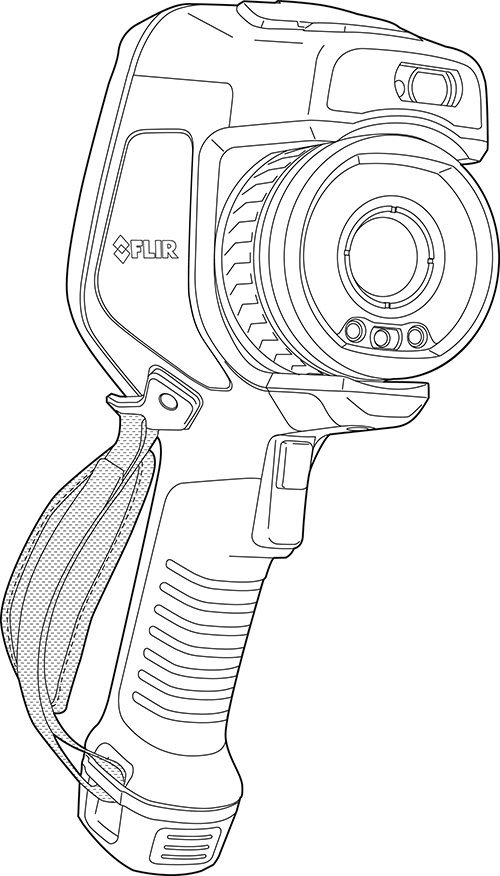
7.13.1 Mounting the hand strap
-
Fit the upper part of the hand strap into the bracket.
![Graphic]()
![Graphic]()
-
Fit the bracket in place on the camera and tighten the screw with the supplied Torx key.
![Graphic]()
-
Thread the loose strap through the attachment point at the base of the camera. Secure the strap with the hook-and-loop fastener.
![Graphic]()
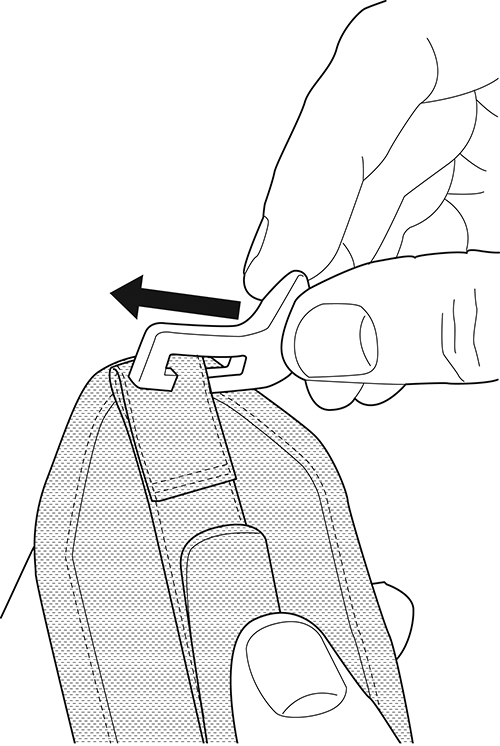
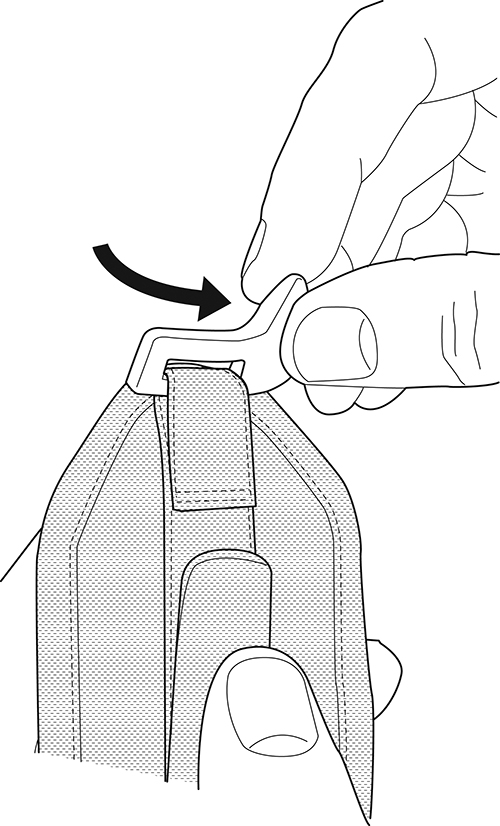
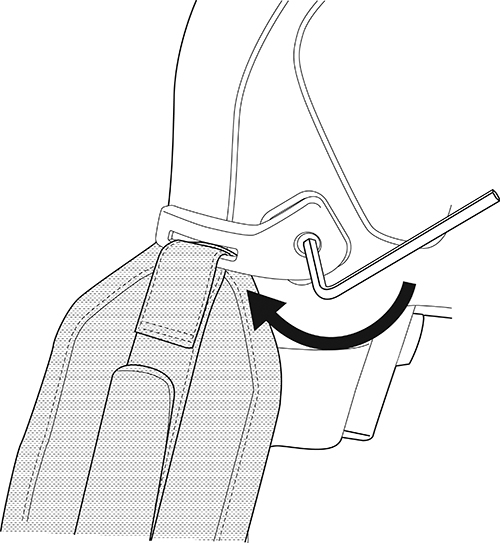
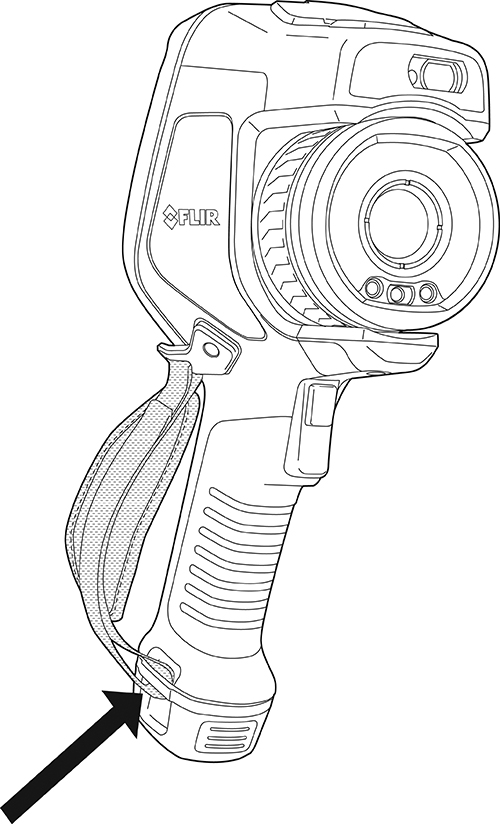
7.14 Lanyard strap
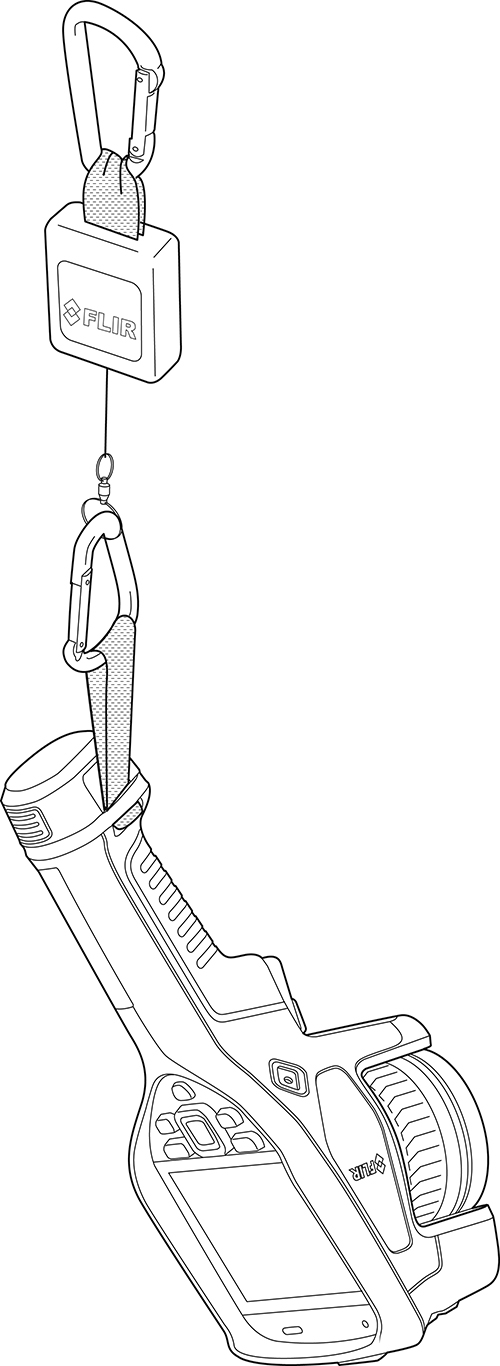
- Remove the camera battery.
-
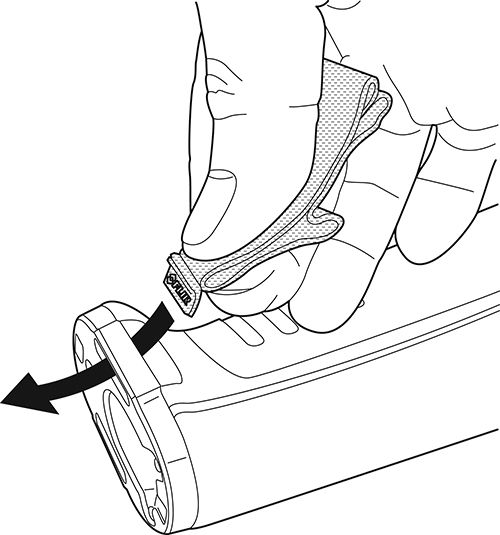
Starting with the FLIR logo part, thread the lanyard strap through the attachment point at the base of the camera.
![Graphic]()
-
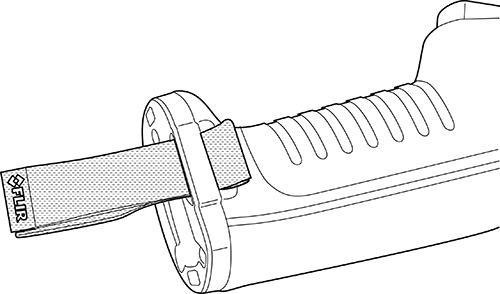
Pull the entire lanyard strap through the attachment point until it stops.
![Graphic]()
7.15 Wrist strap
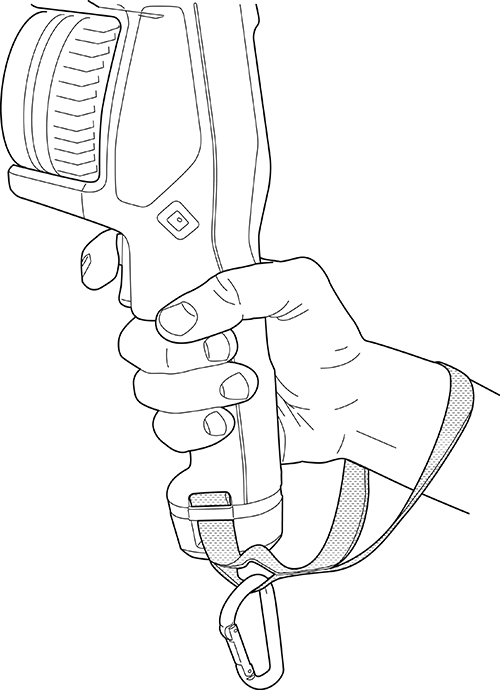
- Remove the camera battery.
-
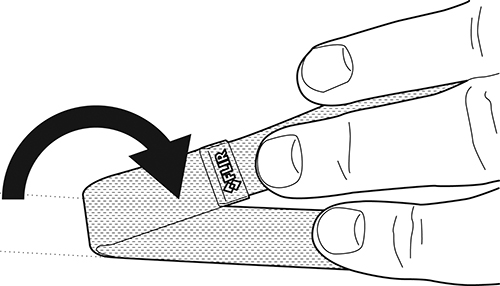
Fold the wrist strap. Make sure that the part with the FLIR logo faces away from the bend.
![Graphic]()
-
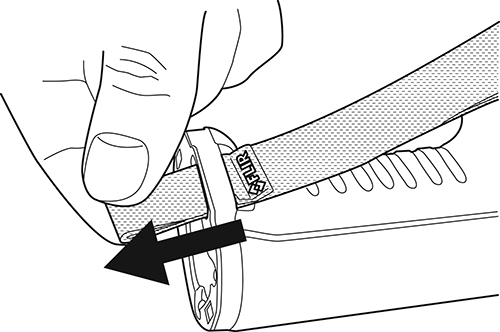
Thread the bent wrist strap through the attachment point at the base of the camera.
![Graphic]()
-
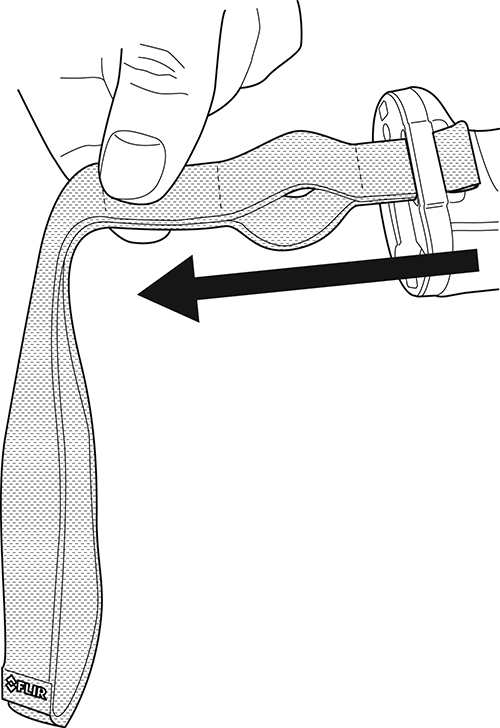
Pull the entire wrist strap through the attachment point until it stops.
![Graphic]()
7.16 Front protection
7.17 Changing camera lenses
-
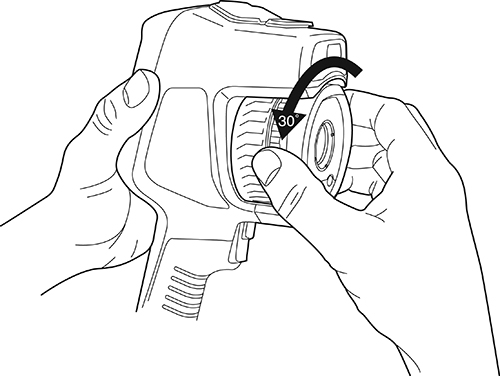
Take a firm grip around the inner ring of the lens. Rotate the inner ring 30° counter-clockwise until it stops.
![Graphic]()
-
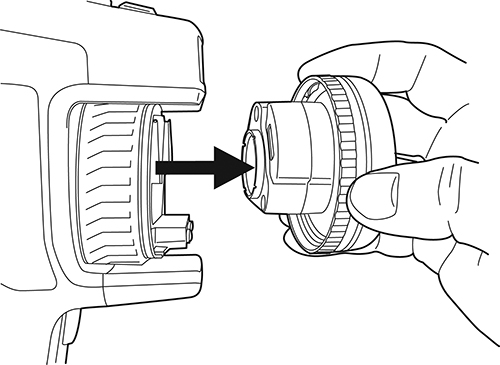
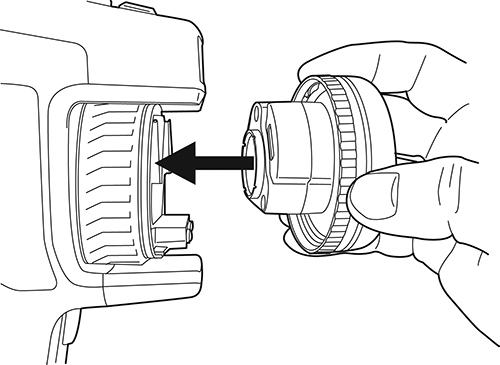
Carefully pull out the lens.
![Graphic]()
-
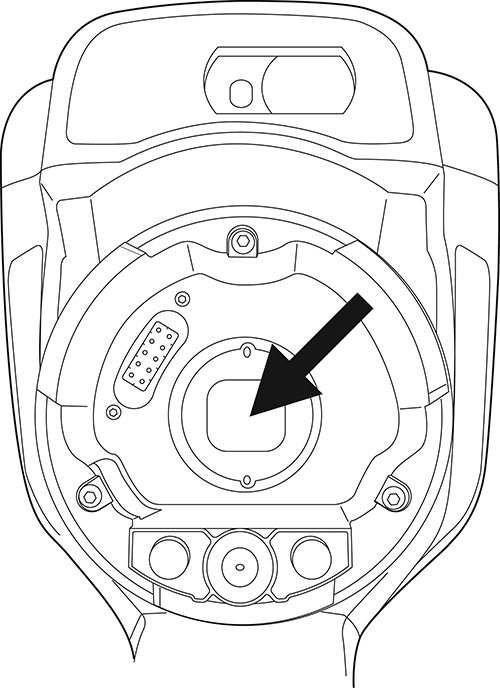
The infrared detector is now fully exposed. Do not touch this surface. If you see dust on the detector, follow the instructions
in
7.12.3 Infrared detector
.
![Graphic]()
-
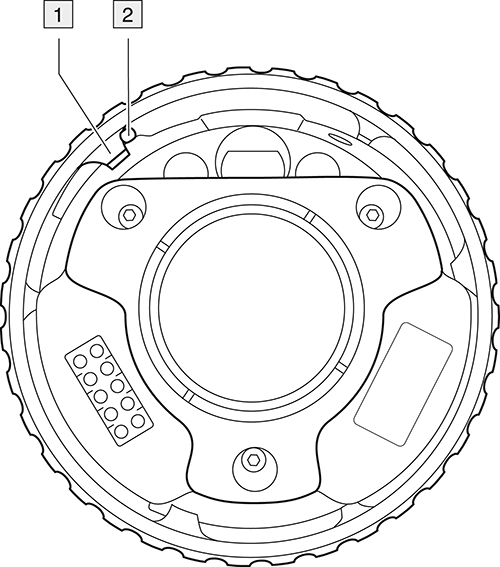
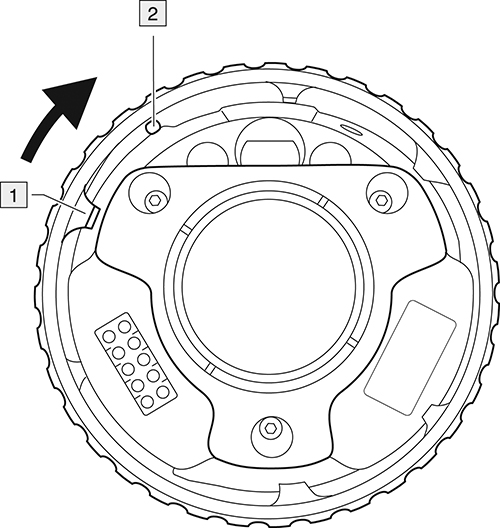
Make sure that the inner ring of the camera lens is fully in its open position.
-
Correct: The tooth (1) is in its end position at the black stop pin (2).
![Graphic]()
-
Wrong: You must rotate the inner ring until the tooth (1) reaches the black stop pin (2).
![Graphic]()
-
Correct: The tooth (1) is in its end position at the black stop pin (2).
-
Carefully push the lens into position.
![Graphic]()
-
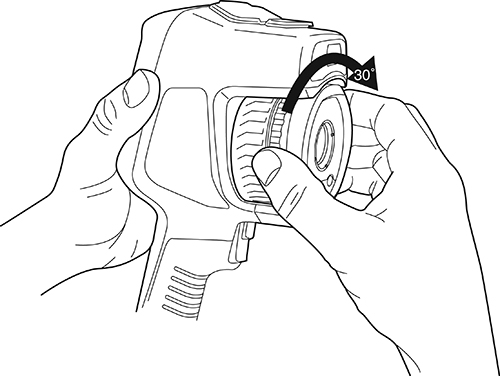
Rotate the inner ring of the lens 30° clockwise. The lens makes a click when it locks in place.
![Graphic]()
-
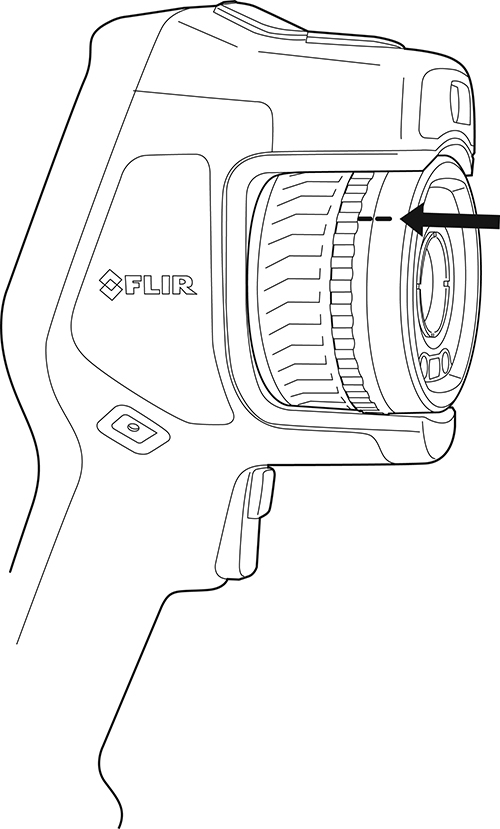
Make sure that the two index marks are aligned, indicating that the lens is locked in place.
![Graphic]()
7.18 Calibrating the lens–camera combination
7.18.1 Introduction
7.18.2 AutoCal procedure
-
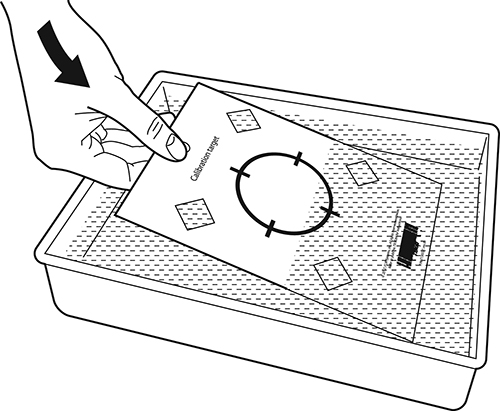
Dip the calibration target in water for 1 second and let the excess drip off.
![Graphic]()
-
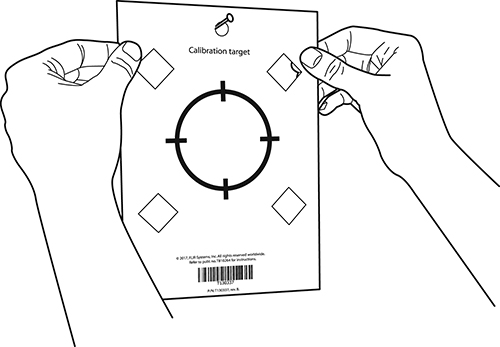
Tape or hang the calibration target on a wall.
![Graphic]()
- Mount the new lens on the camera according to the procedure in section 7.17 Changing camera lenses . When the lens is mounted, the calibration wizard starts automatically.
-
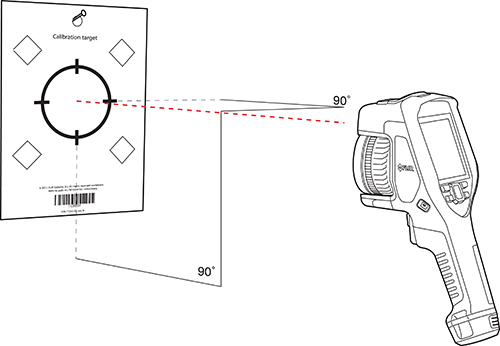
From a distance of 2 m (6.6 ft.), aim the camera toward the crosshair, using the laser pointer. The camera will take a picture automatically.
![Graphic]()
-
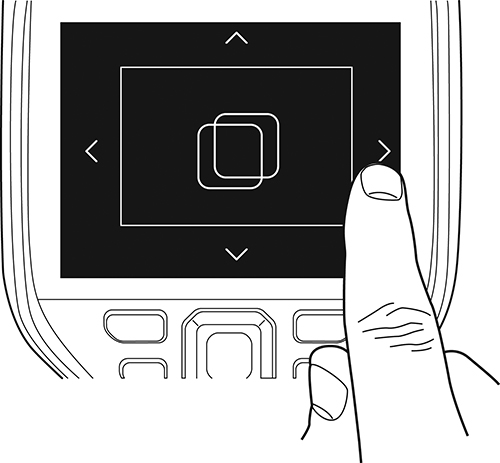
In the camera, align the thermal and visual images (indicated by the two squares in the image below), using the touchscreen
arrows. The lens–camera combination is now calibrated.
![Graphic]()
7.19 Calibrating the compass
Follow this procedure:
Push the navigation pad to display the menu system.
Select
(Settings) and push the navigation pad. This displays the Settings menu.
Use the navigation pad to select Device settings > Geolocation > Compass.
If the Compass check box is unchecked, push the navigation pad to enable the compass.
Select Calibrate compass and push the navigation pad. Follow the on-screen instructions.