10 Setup — Screening station (Auto and Button mode)
This chapter describes how to set up a screening station for Auto mode or Button mode screening.
- For accurate and efficient screening, it is recommended to set up the screening station as outlined in section 10.1 Screening station setup .
- For step-by-step instructions, see section 10.3 Step-by-step setup instructions .
10.1 Screening station setup
The figures below show a typical screening station setup. For more information, see chapter
11 Description — Screening station (Auto and Button mode)
.
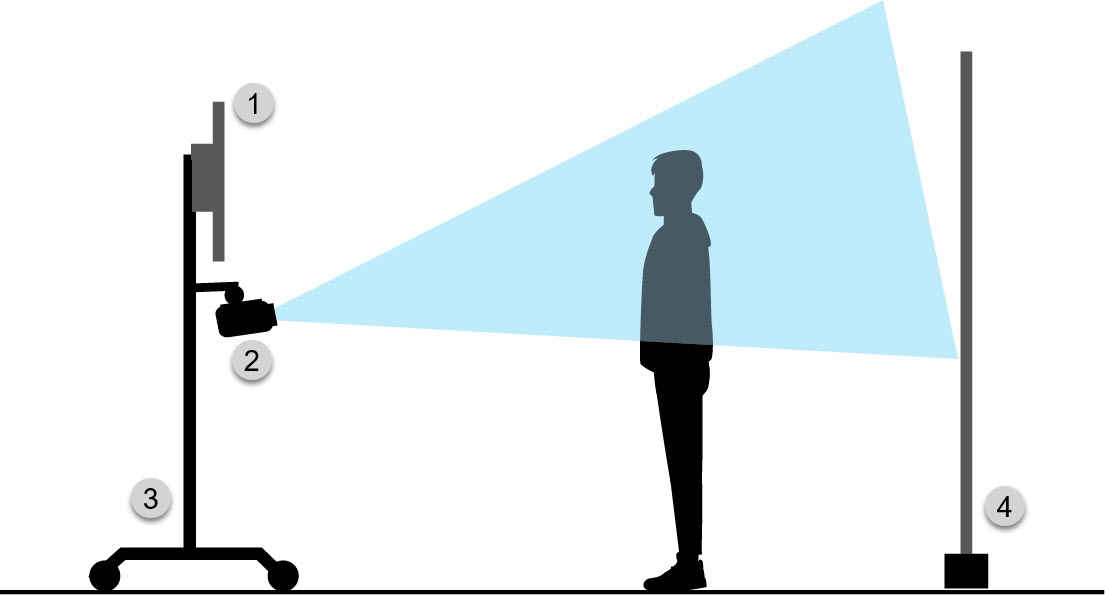
- Visitor display.
- Thermal camera.
- Stand.
- Optional: Backdrop.
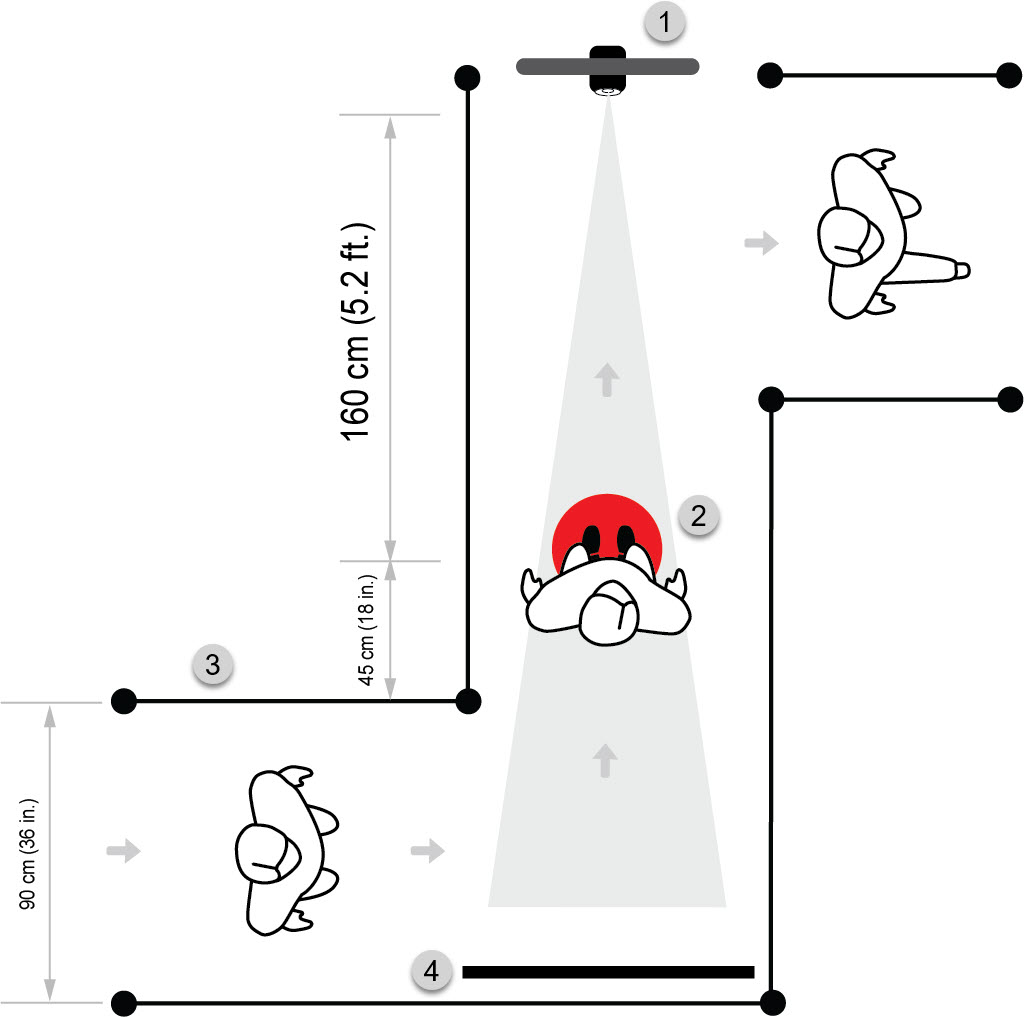
- Stand with thermal camera and visitor display.
-
Screening position.
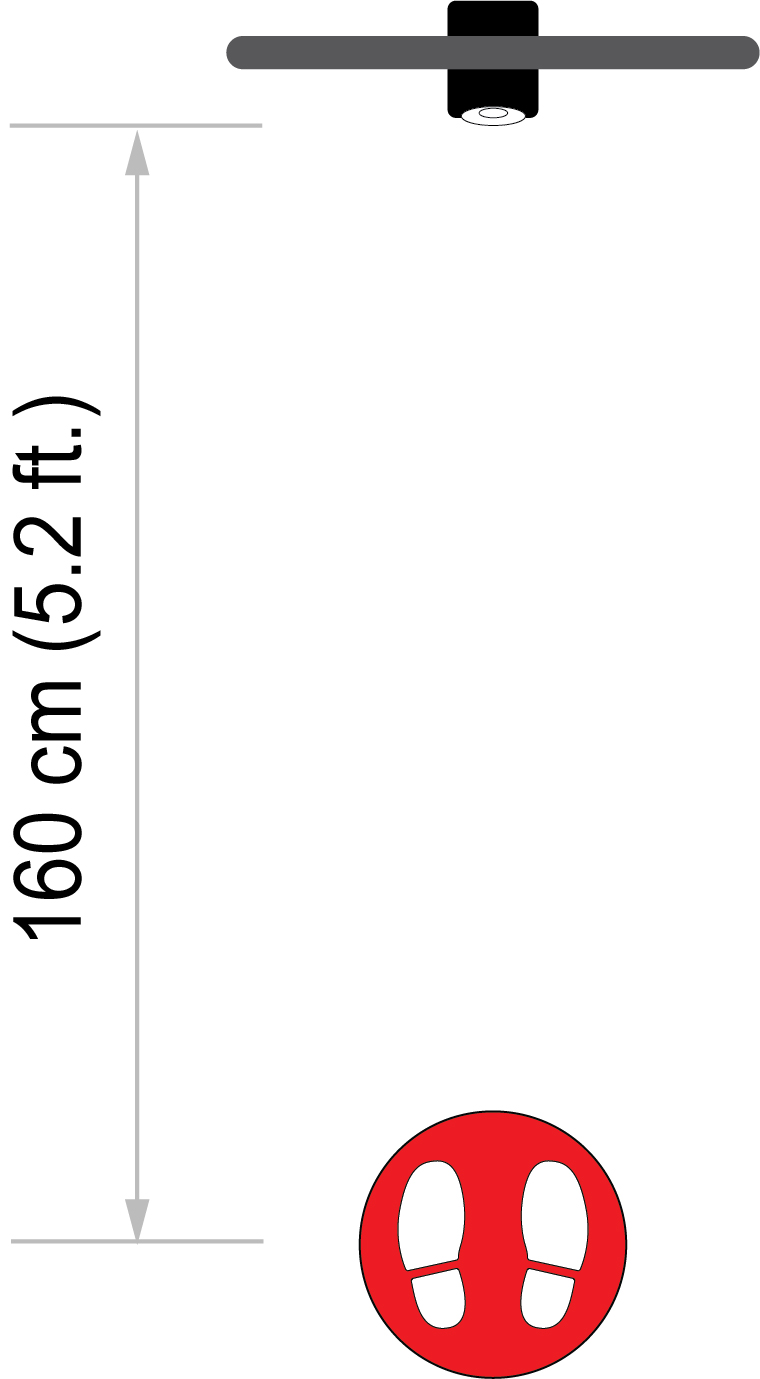
It is important to clearly mark the screening position (where the person should stand for the screening). The distance from the camera lens to the center of the screening position shall be 160 cm (5.2 ft.). -
Queueing system, e.g. barriers and arrow floor stickers.
The queueing system will guide the visitors into the screening station, to the correct screening position, and out of the screening station. A recommended standard is to keep the queue at least 90 cm (36 in.) wide. To make sure people do not cut the corner and end up too close to the camera, about 45 cm (18 in.) should be added to the barrier leading in to the screening station. -
Optional: Backdrop.
A backdrop may be needed to prevent background disturbances from reaching the camera, such as passing or queueing people.
-
Bluetooth button (Remote operation button).
Used in Button mode to trigger the screening. -
Optional: Operator display.
Secondary display placed near the operator for monitoring. -
Optional: Information roll-up.
Roll-up that informs people what the screening is about and why they need to do it. -
Optional: Instruction roll-up.
Roll-up that tells people to remove eyeglasses before they are screened.
Additional, not in the figure:
10.2 Equipment, materials, and tools
This chapter describes the equipment and material needed to set up a screening station for Auto or Button mode screening.
10.2.1 Camera accessories
- USB Type-C to USB Type-C cable
- HDMI adapter (USB Type-C to HDMI and PD adapter)
- Power adapter (Power supply, 15 W/3 A)
- Remote operation button (needed for Button mode)
The following accessories, included in the camera package, are needed:
10.2.2 Display
- Visitor display.
- HDMI cable.
- Power cable.
- Optional: Operator display.
- Optional: HDMI splitter for connection of two displays.
The following display equipment is needed:
10.2.3 Equipment and supporting material
- Mounting equipment for display and camera; e.g. stand, wall mount, tripod, bar table.
- Marker to indicate the screening position; e.g. floor sticker.
- Queueing system; e.g. barriers, arrow stickers.
- Optional: Backdrop, preventing background disturbances.
- Optional: Information materials; e.g. roll-ups.
The following equipment and supporting material are needed:


10.2.4 Materials and tools
- Measuring tape or yardstick.
- Screwdriver.
- Masking tape.
- Cable ties.
- Extension cords.
- Cable covers (to prevent people from stumbling over the cables).
The following materials and tools can be useful:
10.3 Step-by-step setup instructions
Before starting the setup, please read the instructions for the entire setup procedure.
Make sure you have all the needed equipment and material, see section
10.2 Equipment, materials, and tools
.
10.3.1 Main steps
- Plan and prepare the screening station.
- Prepare the camera.
- Prepare the button (Button mode).
- Place the camera and display.
- Define the screening position.
- Adjust the angle of the camera.
- Test the setup.
- Place the queueing system and supporting materials.
- Clearly mark the screening position.
- Mark the positions of all equipment.
The setup procedure includes the following main steps:
10.3.2 Plan and prepare the screening station
Before you set up the screening station, you need to do some planning. Where will you conduct the screening? How should the
visitors flow into the screening station and out? Who will be the operator? What should happen in case of a screening alarm?
- For factors to consider related to the area around the screening station, see section 11.3 Screening station considerations .
- For factors to consider related to the policies of your company, see section 11.4 Company policies .
10.3.3 Prepare the camera
10.3.3.1 New camera
If you have a new camera, do the following:
- Charge the battery for 2 hours using the stand-alone battery charger.
- Push the battery into the battery compartment. The battery makes a click when it locks in place.
10.3.3.2 Turn on the camera
-
To turn on the camera, push the on/off button
![icon]() .
.
-
To turn off the camera, push and hold the on/off button
![icon]() for more than 0.5 second.
for more than 0.5 second.
 .
.10.3.3.3 Configure the camera
For accurate screening results, some important settings are needed in the camera.
-
To display the menu system, push the navigation pad or tap the menu system button
![Graphic]() .
.
- To navigate the menu system, you can use the navigation pad or tap the camera screen.
You access the camera settings via the menu system.

-
Make sure automatic image adjustment mode is active by selecting
 (Temperature scale) and then
  (Auto).
-
Disable continuous autofocus by selecting
![icon]() (Settings) > Device settings > Focus > Continuous autofocus > Off.
(Settings) > Device settings > Focus > Continuous autofocus > Off.
To configure the camera, do the following:
10.3.3.4 Activate and configure Screening mode
-
Activate the screening mode by selecting
 (Settings) > Recording mode > Screening.
-
In the Screening dialog box, do the following:
- Select the option Auto or Button.
- Select if there should be a beep or no sound when the system detects an elevated temperature.
- Select the allowed deviation from the reference average. It is recommended to start with the default value 1.0 ℃ /1.8 ℉ .
10.3.4 Prepare the button
For Button mode screening, the Remote operation button is needed to trigger the screening.
10.3.4.1 Pair with the button
Before you can use the Remote operation button with the camera, you need to pair the devices.
- Press the Remote operation button to wake it up. The button flashes a couple of times.
-
In the camera, select
![icon]() (Settings) > Connections >
Bluetooth
.
(Settings) > Connections >
Bluetooth
.
- Select the Bluetooth check box to enable Bluetooth.
- Select Available devices to start a scan for devices.
- Wait until a list of available devices is displayed.
- Select the button in the list to start the pairing procedure.
- When the pairing is completed, the button is ready to be used with the camera.
10.3.5 Place the camera and display
-
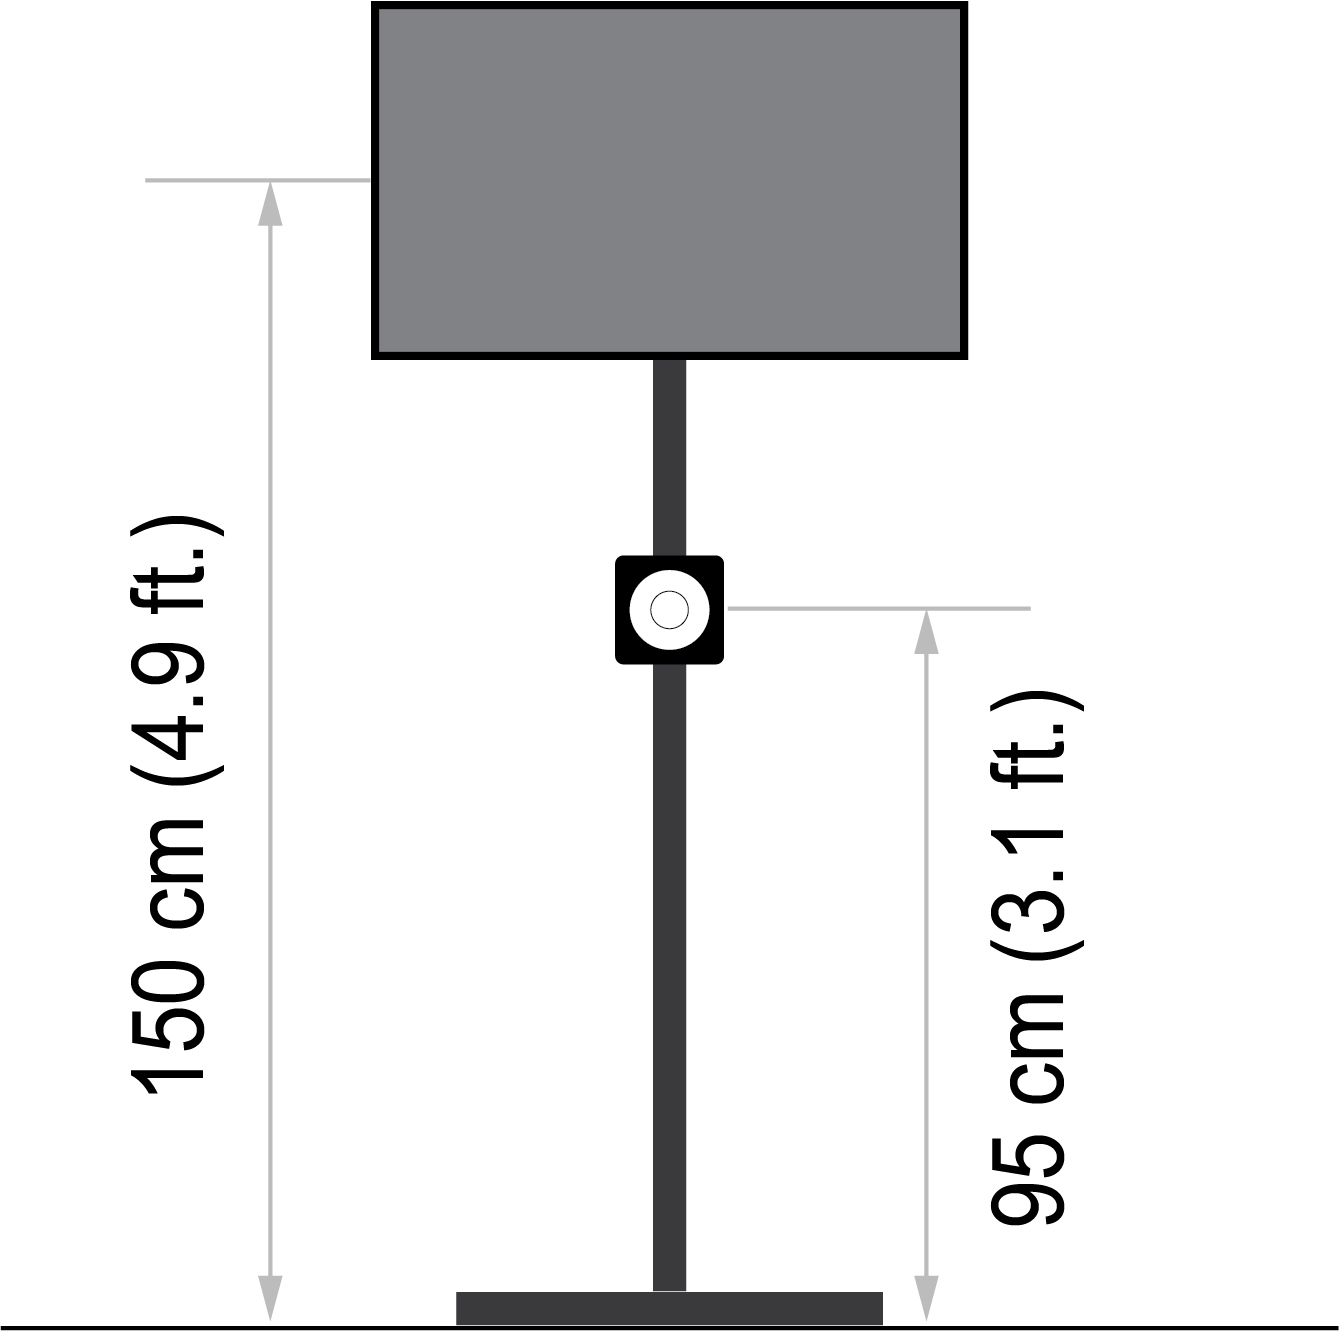
Mount the visitor display and camera.
- The distance from the floor to the center of the display shall be 150 cm (4.9 ft.).
- The camera shall be placed under the display and vertically aligned with the display.
- The distance from the floor to the camera lens shall be 95 cm (3.1 ft.).
![Graphic]()
-
Connect the camera and display(s).
-
Connect the display(s).
- Visitor display: Connect the display to the HDMI adapter.
- Visitor and operator displays: Connect the displays to the HDMI splitter.
- Open the cover at the top of the camera. Connect the USB Type-C cable from the camera to the HDMI adapter/splitter.
- Connect the HDMI adapter/splitter to the power adapter. Connect the power adapter to a power outlet.
- Change the display settings so it never enters sleep mode.
-
Connect the display(s).
- Remove the lens cover from the camera.
- Turn on the camera and make sure the camera image is visible on the display(s).
- Applicable to Button mode: Place the Remote operation button so that the operator can view the screening station and trigger the screening.
10.3.6 Define the screening position
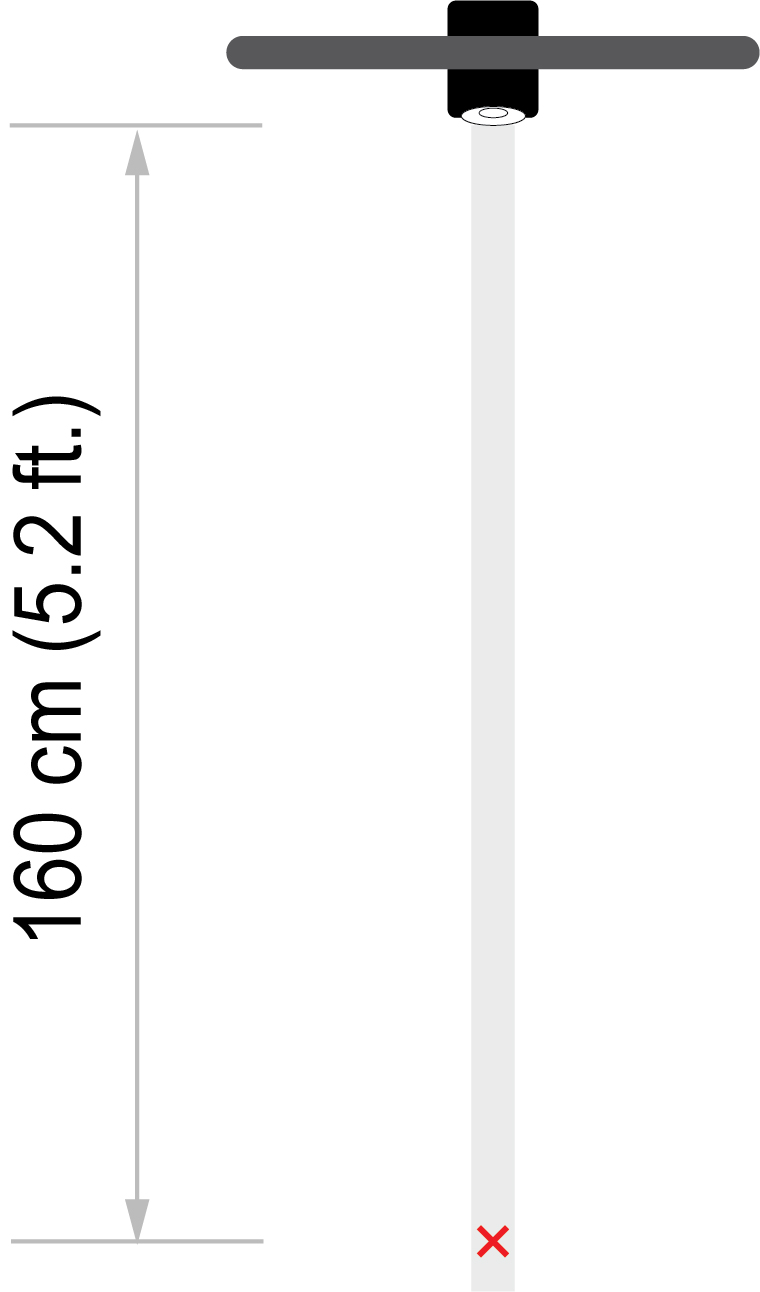
- Make a straight line from the camera towards the screening position - use a masking tape.
- Make a mark on the tape at 160 cm (5.2 ft.) from the camera lens, indicating the screening position.
10.3.7 Adjust the angle of the camera
- Place a 170 cm (5.6 ft.) tall person at the screening position.
- Tilt the camera so that it aims at the face of the person.
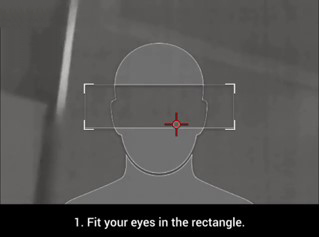
- Look at the image on the display and adjust the angle of the camera until the eyes of the person are inside the box.
10.3.8 Test the setup (Auto mode)
-
Enter initiation mode by first selecting another Recording mode and then selecting the Screening mode again.
To change the Recording mode, select
(Settings) > Recording mode.
- In the Screening dialog box, select Auto.
-
The camera must first record an initial sample for the reference temperature calculation.
Place a person at the marking on the tape that indicates the screening position. The camera graphics may indicate that the person needs to move closer to the camera, which is OK to do.
- Make sure the person looks into the camera and stands still until a screening result is displayed.
- Check that the camera focus is correct and that the measurement was done at the tear duct. If not, deactivate and activate the Screening mode again and restart the initiation.
- Wait for two minutes. Make sure there is no people or movement in front of the camera. During this time, the camera adapts to the ambient temperature.
- Place a person at the marking for the screening position (not closer or further away from the camera).
-
Check that:
- A screening result is displayed with the person standing at the screening position (not closer).
- The measurement was done at the tear duct. If not, deactivate and activate the Screening mode again and restart the initiation.
-
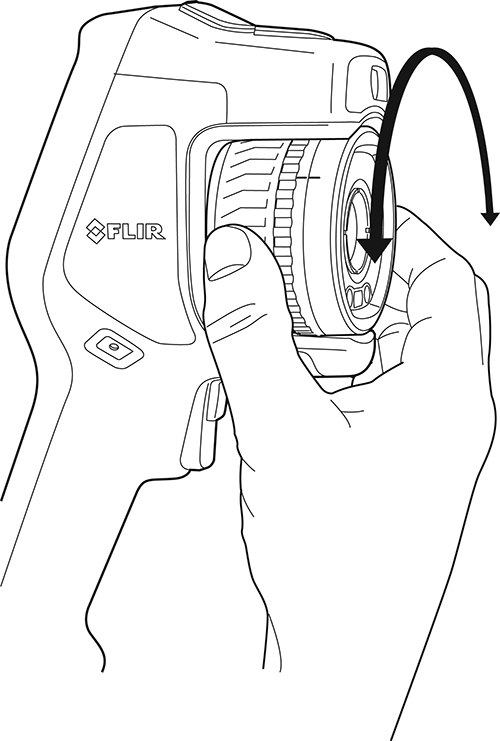
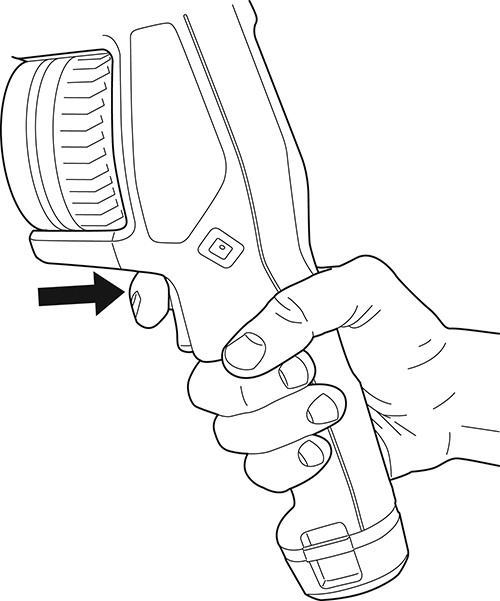
The camera focus is correct. If not, adjust the focus by rotating the focus ring or by pushing the autofocus button.
-
Place persons of different heights at the marking for the screening position (not closer or further away from the camera).
Look at the image on the display and check that it is possible for the person to get the eyes inside the box.
- Tall persons may have to bend their knees.
- Short persons may need e.g. a high chair to sit on.
To test the setup for Auto mode screening, do the following:
10.3.9 Test the setup (Button mode)
-
Enter initiation mode by first selecting another Recording mode and then selecting the Screening mode again.
To change the Recording mode, select
(Settings) > Recording mode.
- In the Screening dialog box, select Button.
- Place a person at the marking on the tape that indicates the screening position. Make sure the person looks into the camera and stands still until the initiation is completed and a screening result is displayed.
- Press the Remote operation button. This starts the initiation.
- During the initiation, the camera automatically adjusts the focus and resets the reference temperature average.
-
When the initiation is completed, check that the camera focus is correct and that the measurement was done at the tear duct.
If the camera is out of focus or the measurement was not done at the tear duct, deactivate and activate the Screening mode again and repeat the initiation.
-
Place persons of different heights at the marking for the screening position (not closer or further away from the camera).
Look at the image on the display and check that it is possible for the person to get the eyes inside the box.
- Tall persons may have to bend their knees.
- Short persons may need e.g. a high chair to sit on.
To test the setup for Button mode screening, do the following:
10.3.10 Place the queueing system and supporting materials
- Place the barriers that will guide the persons through the screening station.
- Place the arrow stickers.
Queueing system.
- Place the backdrop behind the screening position.
- Look at the live image on the display and make sure the camera only sees the backdrop.
Optional: Backdrop.
- Place the information roll-up
- Place the instruction roll-up
Optional: Information materials.
10.3.11 Clearly mark the screening position
-
Clearly mark the screening position, e.g. by a floor sticker.
The distance from the camera lens to the screening position shall be 160 cm (5.2 ft.). - Remove the masking tape.
10.3.12 Mark the positions of all equipment
Mark the positions of any movable equipment (e.g. stand with camera and display, backdrop, barrier poles) e.g. by tape on
the floor. This to ensure that everything is put back in the right place after e.g. cleaning of the floor.
10.4 Height of screened persons
The screening station setup is adapted for persons with an average height of 170 cm (5.6 ft.). With this setup, the system
will screen persons with a height of 150-195 cm (4.9–6.4 ft.).
- Very short persons may need e.g. a high chair to sit on.
- Very tall persons may have to bend their knees.
To adapt the screening station for a shorter or taller average height, lower or raise both the display and the camera. The
distance from the center of the display to the camera lens shall still be 150–95=55 cm (4.9–3.1=1.8 ft.).