6 Setup — Screening station
This chapter describes how to set up a FLIR EST Kiosk screening station.
- For accurate and efficient screening, it is recommended to set up the screening station as outlined in section 6.1 Screening station setup .
- For step-by-step instructions, see section 6.3 Step-by-step setup instructions .
- If you run into problems, see section 6.6 Trouble shooting .
6.1 Screening station setup
The figure below shows a typical screening station setup. For more information, see chapter
7 Description — Screening station
.
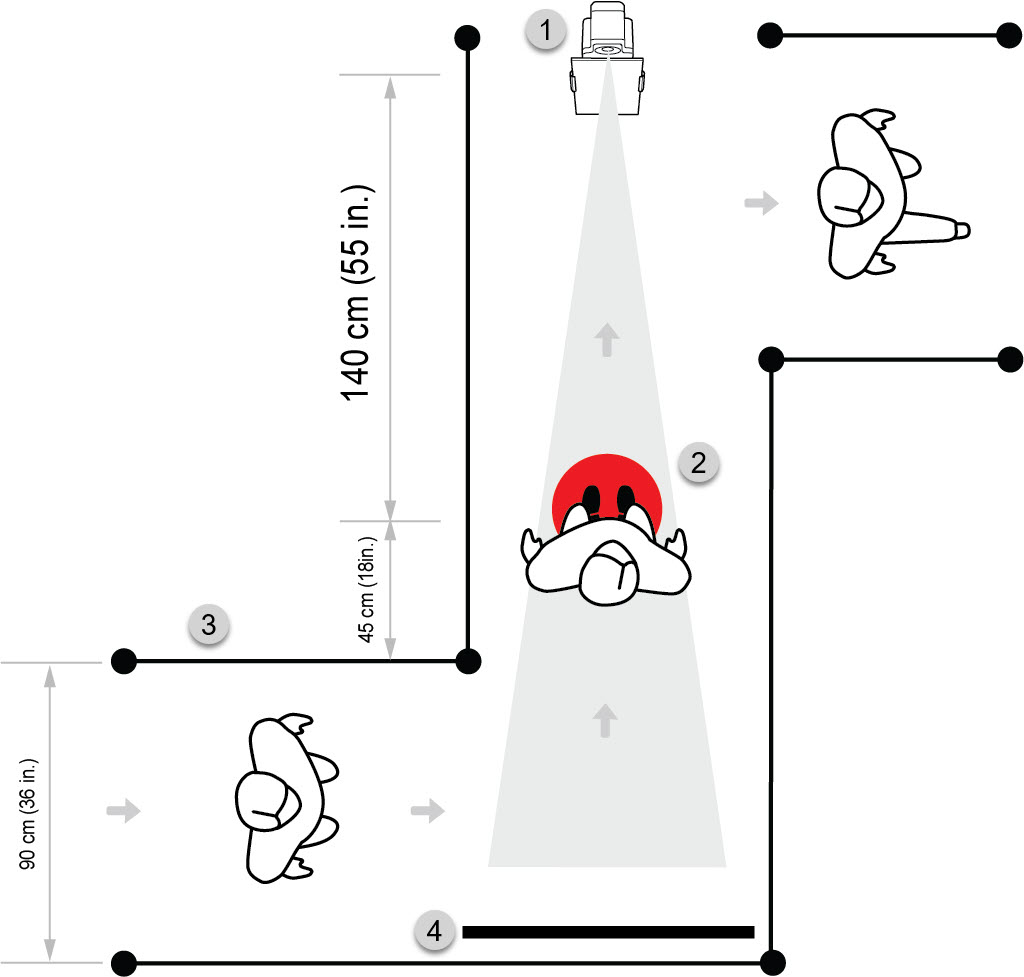
- FLIR EST Kiosk.
-
Screening position.
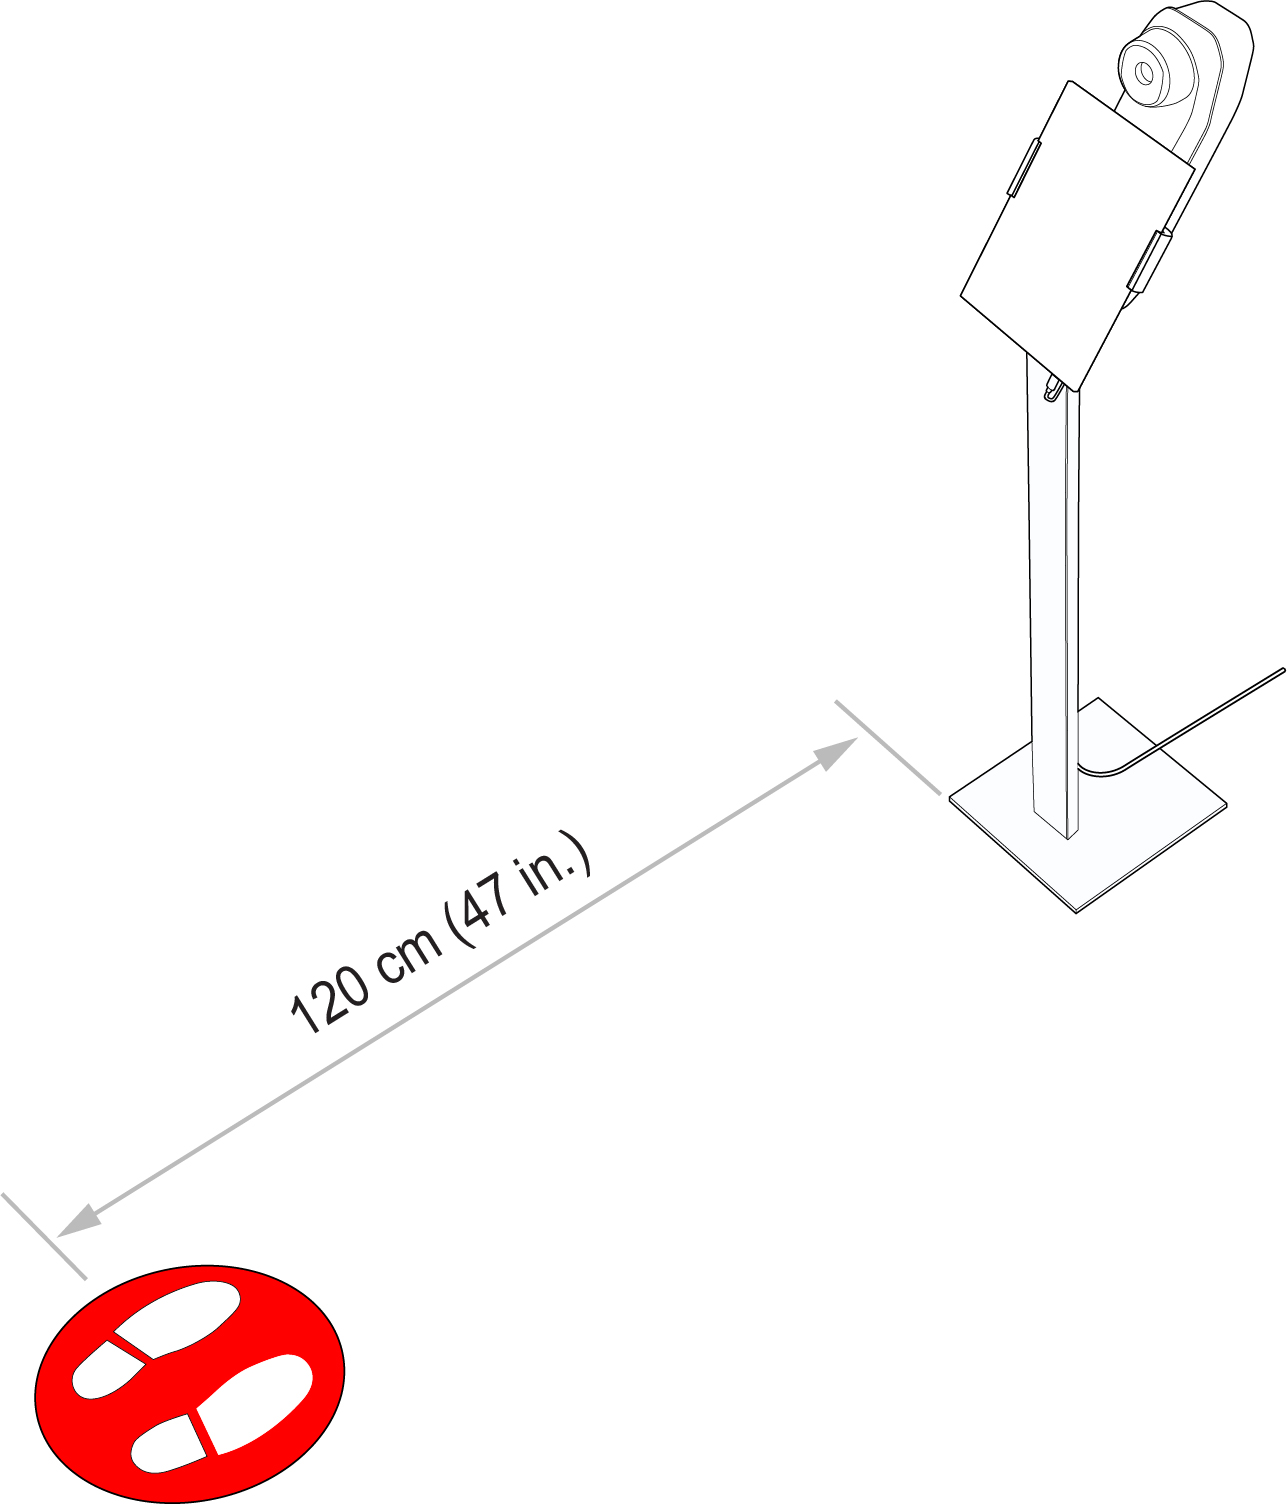
It is important to clearly mark the screening position (where the person should stand for the screening). The distance from the foot of the FLIR EST Kiosk to the center of the screening position shall be 120 cm (47 in.). -
Queueing system, e.g. barriers and arrow floor stickers.
The queueing system will guide the visitors into the screening station, to the correct screening position, and out of the screening station. A recommended standard is to keep the queue at least 90 cm (36 in.) wide. To make sure people do not cut the corner and end up too close to the FLIR EST Kiosk, about 45 cm (18 in.) should be added to the barrier leading in to the screening station. -
Optional: Backdrop.
A backdrop may be needed to prevent background disturbances from reaching the camera, such as passing or queueing people.
-
Optional: Operator display.
Secondary display placed near the operator for monitoring. -
Optional: Information roll-up.
Roll-up that informs people what the screening is about and why they need to do it. -
Optional: Instruction roll-up.
Roll-up that tells people to remove eyeglasses before they are screened.
Additional, not in the figure:
6.2 Equipment, materials, tools
- FLIR EST Kiosk, installed as described in chapter 5 Installation — FLIR EST Kiosk .
- Screening position floor sticker (included in the FLIR EST Kiosk package).
- Queueing system; e.g. barriers, arrow stickers.
For the screening station, you need the following equipment:
- Operator display, including power cable and wireless display adapter.
- Backdrop, preventing background disturbances.
- Information materials; e.g. roll-ups.
Optional equipment:
- Measuring tape or yardstick.
- Screwdriver.
- Masking tape.
- Cable ties.
- Extension cords.
- Cable covers (to prevent people from stumbling over the cables).
The following materials and tools can be useful:
6.3 Step-by-step setup instructions
Before starting the setup, please read the instructions for the entire setup procedure.
Make sure you have all the equipment and tools needed, see section
6.2 Equipment, materials, tools
.
- Plan and prepare the screening station.
- Set up the FLIR EST Kiosk.
- Define the screening position.
- Connect the camera to FLIR Screen-EST.
- Make sure the camera focus is correct.
- Place the queueing system and supporting materials.
- Optional: Place the operator display.
- Test the setup.
- Clearly mark the screening position.
- Mark the positions of all equipment.
The setup of the screening station includes the following main steps:
6.3.1 Plan and prepare the screening station
Before you set up the screening station, you need to do some planning. Where will you conduct the screening? How should the
visitors flow into the screening station and out? Who will be the operator? What should happen in case of a screening alarm?
- For factors to consider related to the area around the screening station, see section 7.3 Screening station considerations .
- For factors to consider related to the policies of your company, see section 7.4 Company policies .
6.3.2 Set up the FLIR EST Kiosk
- Place the FLIR EST Kiosk.
- Connect the power cable to a power outlet.
6.3.3 Define the screening position
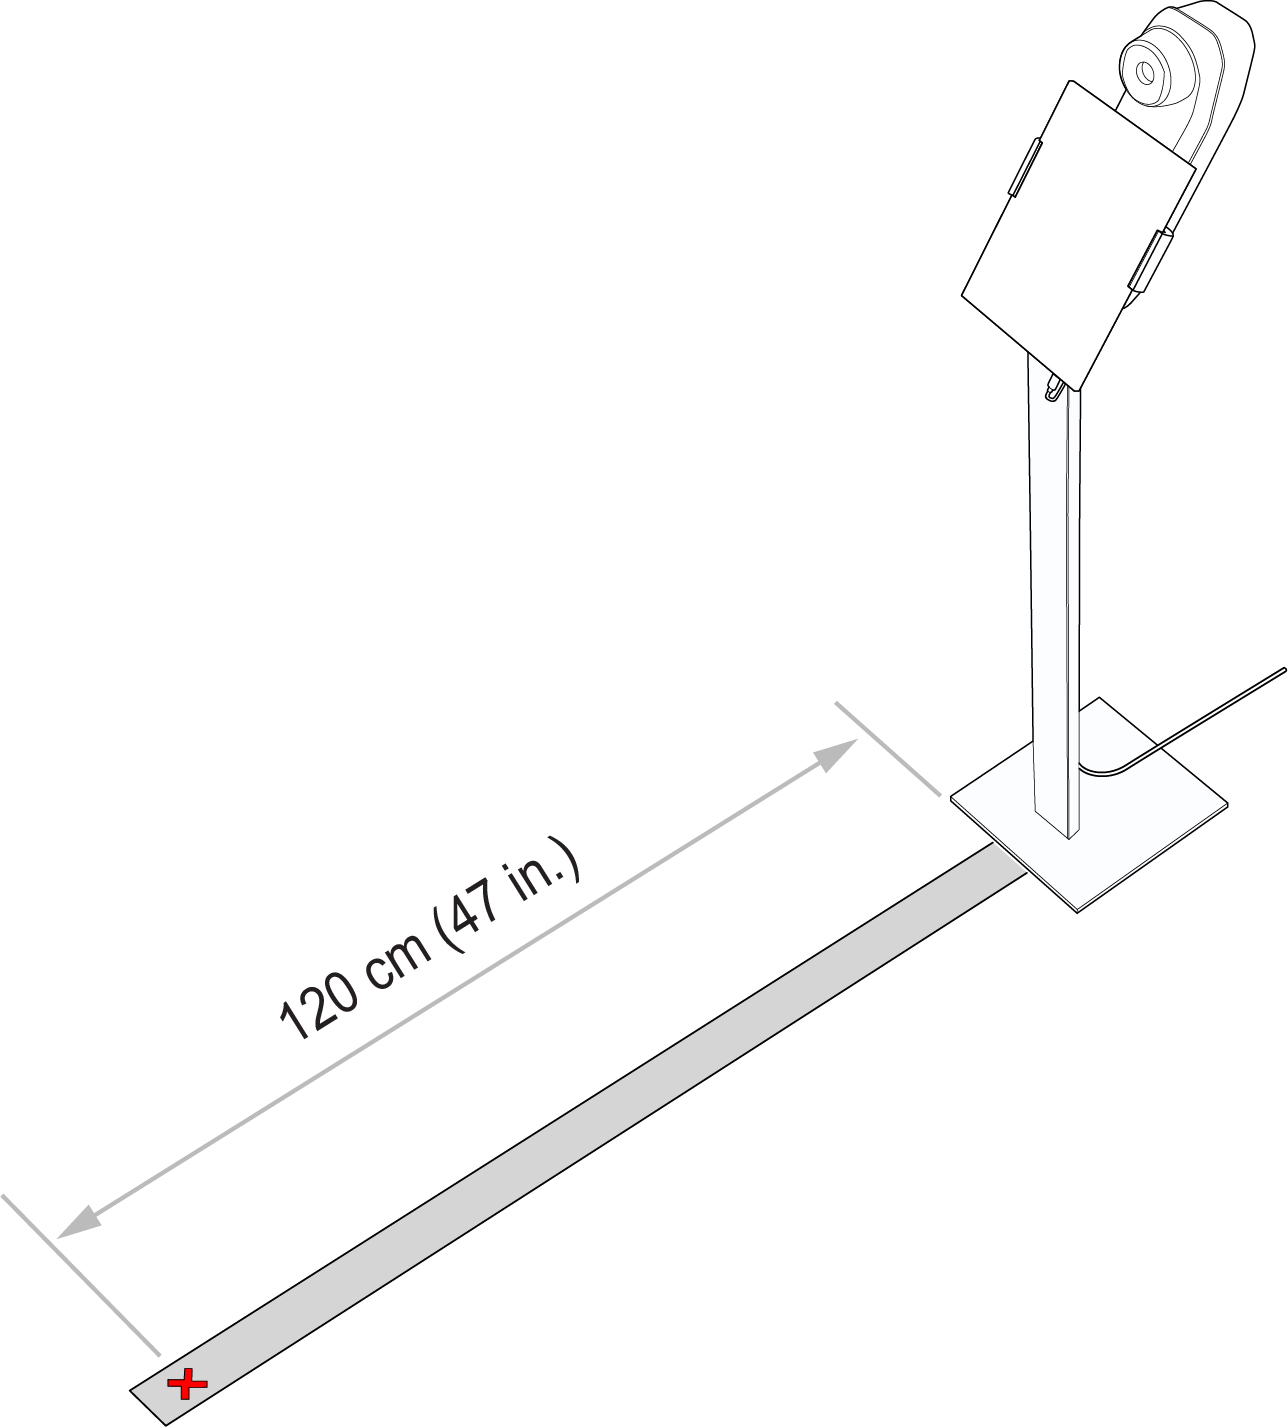
- Make a straight line from the foot of the FLIR EST Kiosk stand towards the screening position - use a masking tape.
- Make a mark on the tape at 120 cm (47 in.) from the foot of the stand, indicating the screening position.
6.3.4 Connect the camera to FLIR Screen-EST
- Turn on the tablet and start the FLIR Screen-EST application.
-
Find the FLIR camera in the Discovery list and tap the connect button. This connects the camera and displays live images.
-
Make sure the Auto-reconnect check box is selected. This will make the camera connect automatically the next time you start FLIR Screen-EST.
6.3.5 Make sure the camera focus is correct
- Place a person at the marking on the tape that indicates the screening position.
-
In the FLIR Screen-EST operator window, click the Auto adjust focus button. This adjusts the focus automatically.
6.3.6 Place the queueing system and supporting materials
- Place the barriers that will guide the persons through the screening station.
- Place the arrow stickers.
Queueing system.
- Place the backdrop behind the screening position.
- Look at the live images in FLIR Screen-EST and make sure the camera only sees the backdrop.
Optional: Backdrop.
- Place the information roll-up
- Place the instruction roll-up
Optional: Information materials.
6.3.7 Optional: Place the operator display
- Place the operator display.
- Connect power to the display.
- Connect the display to the tablet using a wireless display adapter.
6.3.8 Test the setup
Make sure the system detects faces of persons with different heights.
- Start the FLIR Screen-EST.
- Maximize the visitor window.
-
Check that a screening result is displayed when persons of different heights stand at the screening position.
- Tall persons may have to bend their knees.
- Short persons may need e.g. a high chair to sit on.
6.3.9 Clearly mark the screening position
-
Attach the supplied screening position floor sticker to the floor.
The distance from the foot of the FLIR EST Kiosk stand to the center of the floor sticker shall be 120 cm (47 in.). - Remove the masking tape.
6.3.10 Mark the positions of all equipment
Mark the positions of any movable equipment (e.g. FLIR EST Kiosk, backdrop, barrier poles) e.g. by tape on the floor. This to ensure that everything is put back in the right place after
e.g. cleaning of the floor.
6.4 Optional: Customize FLIR Screen-EST
It is possible to run FLIR Screen-EST with the default settings. It is also possible to customize FLIR Screen-EST according to your company policies (see section
7.4 Company policies
). You can select what the visitors see on the screen. There is also a sound alarm option.
6.4.1 Open the Settings page
- In the FLIR Screen-EST operator window, tap the Live tab. This displays the toolbar.
-
Tap the Options button and then the Settings button. This opens the Settings page.
To open the Settings page, do the following:
6.4.2 Visitor window
You customize the visitor window on the User screen tab.
- Here you can change the status messages, e.g. translate the messages to your local language.
Custom status messages
- Select the font size for the status messages.
Message font size
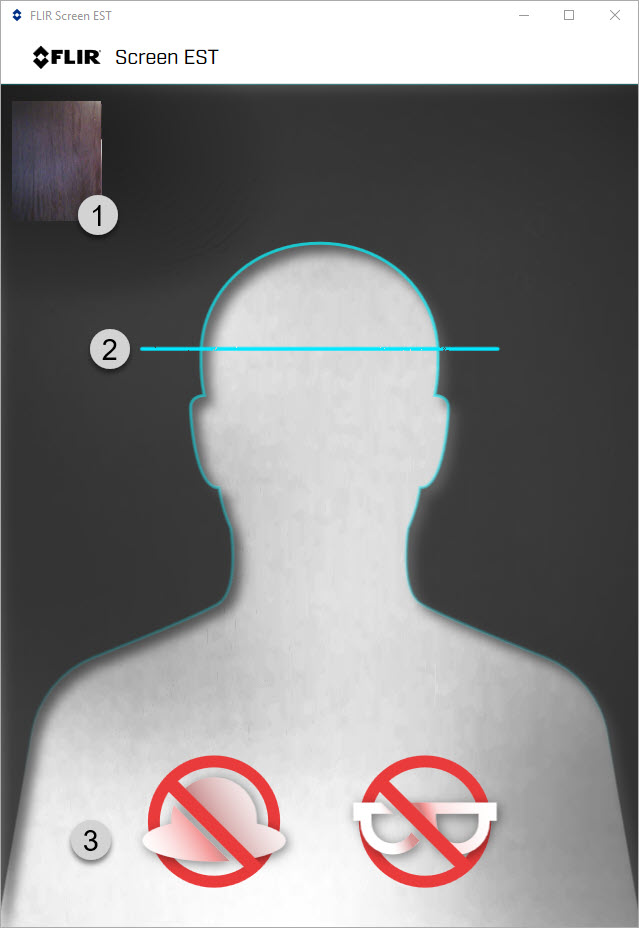
- Select the Show secondary image check box to display both thermal and visual video.
- Use the Show hats/glasses/masks check boxes to select what symbols to display.
- Select the Enable animations check box to have a moving blue line in the visitor window, indicating that the system is in operation.
- Use the Swap video streams check box to select the display of thermal or visual video.
Visibility settings
6.4.3 Sound alarm
It is possible to have a sound when the system detects an elevated temperature. You select this on the Output tab.
- Select the Use sound alarm check box to have a sound when an elevated temperature is detected.
Alarm
6.4.4 Save and exit
When all settings are completed, tap Close at the bottom right of the page. This closes the Settings page.
6.5 Settings for 24/7 operation
If you plan to run the screening station 24/7 without any operator interaction, you may want to enable some automatic functions.
6.5.1 Automatic reset of moving average
If there has been a long time since the last screening, the moving average may not be at the correct level and there is a
risk for false negatives. One way of limiting this risk is to reset the moving average, manually or automatically. The system
will then start to build up a new moving average. For more information, see section
10.4.3.1 Reset of moving average
.
After an automatic reset of the moving average, the system will evaluate also the first screened person (which is not the case after a manual
reset). Since there is no average to compare with after the reset, a fixed temperature value will be used for the evaluation
of the first person.
The default fixed temperature value can be used as a starting point. However, the appropriate value depends on factors such
as environmental conditions and time of day. It is recommended to establish a fixed temperature value adapted to your local
conditions.
6.5.1.1 Establish fixed temperature value
The fixed temperature value can be established by checking the measured temperatures in FLIR Screen-EST at the same time for three days in a row and then use the highest of these temperatures.
- Make a decision on the likely time for the first person to enter the screening station after a reset of the moving average.
-
At the same time (as decided above) for three days in a row, check the operator window and make a note of the measured temperatures.
- Use the highest of the recorded temperatures as your fixed temperature value.
To establish the fixed temperature value, do the following:
6.5.1.2 Enable automatic reset
- Open the Settings page, see section 6.4.1 Open the Settings page .
- On the Face detection tab, select the Reset moving average after specified time check box.
- In the Reset after fields, enter the time (hours:minutes).
- In the Temperature after reset field, enter your fixed temperature value (see section 6.5.1.1 Establish fixed temperature value ).
To enable automatic reset of the moving average, do the following:
6.5.2 Automatic restart of screening
Windows devices are sometimes forced to restart, for example after a Windows update, which also closes all applications. The
device may also shut down completely if the battery level is very low. By a setting, you can ensure that FLIR Screen-EST starts up automatically when the device restarts.
There is also a setting that will make FLIR Screen-EST restart automatically after an unexpected crash or if the application is not responding.
FLIR Screen-EST stores all settings and states, including the moving average, during an on-going screening session. When an automatic function
starts FLIR Screen-EST after an unexpected system restart or application failure, the stored values will be used and the screening can continue
without any operator interaction.
- Open the Settings page, see section 6.4.1 Open the Settings page .
-
On the General tab, do the following:
- Select the Start application on system start-up check box to enable automatic start of FLIR Screen-EST.
- Select the Enable application monitoring check box to enable automatic restart after an application failure.
- In the operator window, make sure the Auto-reconnect check box is selected. This will make the camera connect automatically, allowing the screening to start again.
To enable automatic restart of the screening, do the following:
6.6 Trouble shooting
6.6.1 Must enter license key every time
If you must enter the license key every time you start FLIR Screen-EST, the application has not been successfully activated.
Follow the instructions in section
5.4 Activate FLIR Screen-EST
. When you have entered the license key, make sure you tap the Validate button (not the Demo mode button).

6.6.2 FLIR Screen-EST cannot find the camera
- Restart the FLIR Screen-EST application.
- Restart the tablet.
- Restart the camera by disconnecting and then re-connecting the power cable to a power outlet.
-
Check the tablet firewall settings.
Open the Windows Defender Security Center and go to the Firewall settings. Make sure the FLIR Screen-EST application is allowed to communicate through the firewall. - Check the camera firewall settings, see section 11.2.3 Firewall configuration .
If FLIR Screen-EST cannot find the camera, try the following:
6.6.3 False triggering
Persons and objects in the background can cause false triggering. To prevent background disturbances from reaching the camera,
it is recommended to place a backdrop behind the screening position.
6.6.4 False alarms
If you are experiencing many false screening alarms, you may need to adjust the Allowed deviation setting on the Face detection tab.
The Allowed deviation is how much the measured temperature can differ from the moving average without triggering an alarm. A higher value will
lead to fewer false alarms, but there will also be a risk of missing people with elevated skin temperatures. A lower value
will detect smaller elevations in skin temperatures, but it will also generate more false alarms.
6.6.5 Cannot screen short/tall persons
The screening station is set up to screen persons with a height of 145-190 cm (4.8–6.2 ft.).
The screened person shall stand at the screening position (not closer or further away from the camera).
- Tall persons may have to bend their knees.
- Short persons may need e.g. a high chair to sit on.
The screening works best when the FLIR Screen-EST is configured for portrait mode. On the Settings page, select the Face detection tab and ensure the following settings:
- Set Image orientation = Portrait.
- Set Region of interest: Initial horizontal size = 80,0 and Initial vertical size = 98.0.
